由用户创建的信息 Pavel Kotov
28 September 2015 18:29
28 September 2015 15:28
Я на английском форуме писал о похожем:
Там в сообщении есть бленд файл. Задача была отрендерить сцену как с 4 камер наблюдения - для этого есть основная сцена и 4 вспомогательных. В вашем случае будет достаточно двух сцен - можно линкануть персонажа с главной сцены во вспомогательную. Над персонажем тогда надо расположить стрелку, чтобы ее было видно только сверху (с backface culling), и прицепить ее к нему. Тогда во второй сцене будет видна только эта стрелка, а в первой - бегающий персонаж, ну, или что у вас там![smiling]()
Ну, и во вторую сцену можно добавить плоскость с текстурой карты.
Там в сообщении есть бленд файл. Задача была отрендерить сцену как с 4 камер наблюдения - для этого есть основная сцена и 4 вспомогательных. В вашем случае будет достаточно двух сцен - можно линкануть персонажа с главной сцены во вспомогательную. Над персонажем тогда надо расположить стрелку, чтобы ее было видно только сверху (с backface culling), и прицепить ее к нему. Тогда во второй сцене будет видна только эта стрелка, а в первой - бегающий персонаж, ну, или что у вас там
Ну, и во вторую сцену можно добавить плоскость с текстурой карты.
21 September 2015 17:47
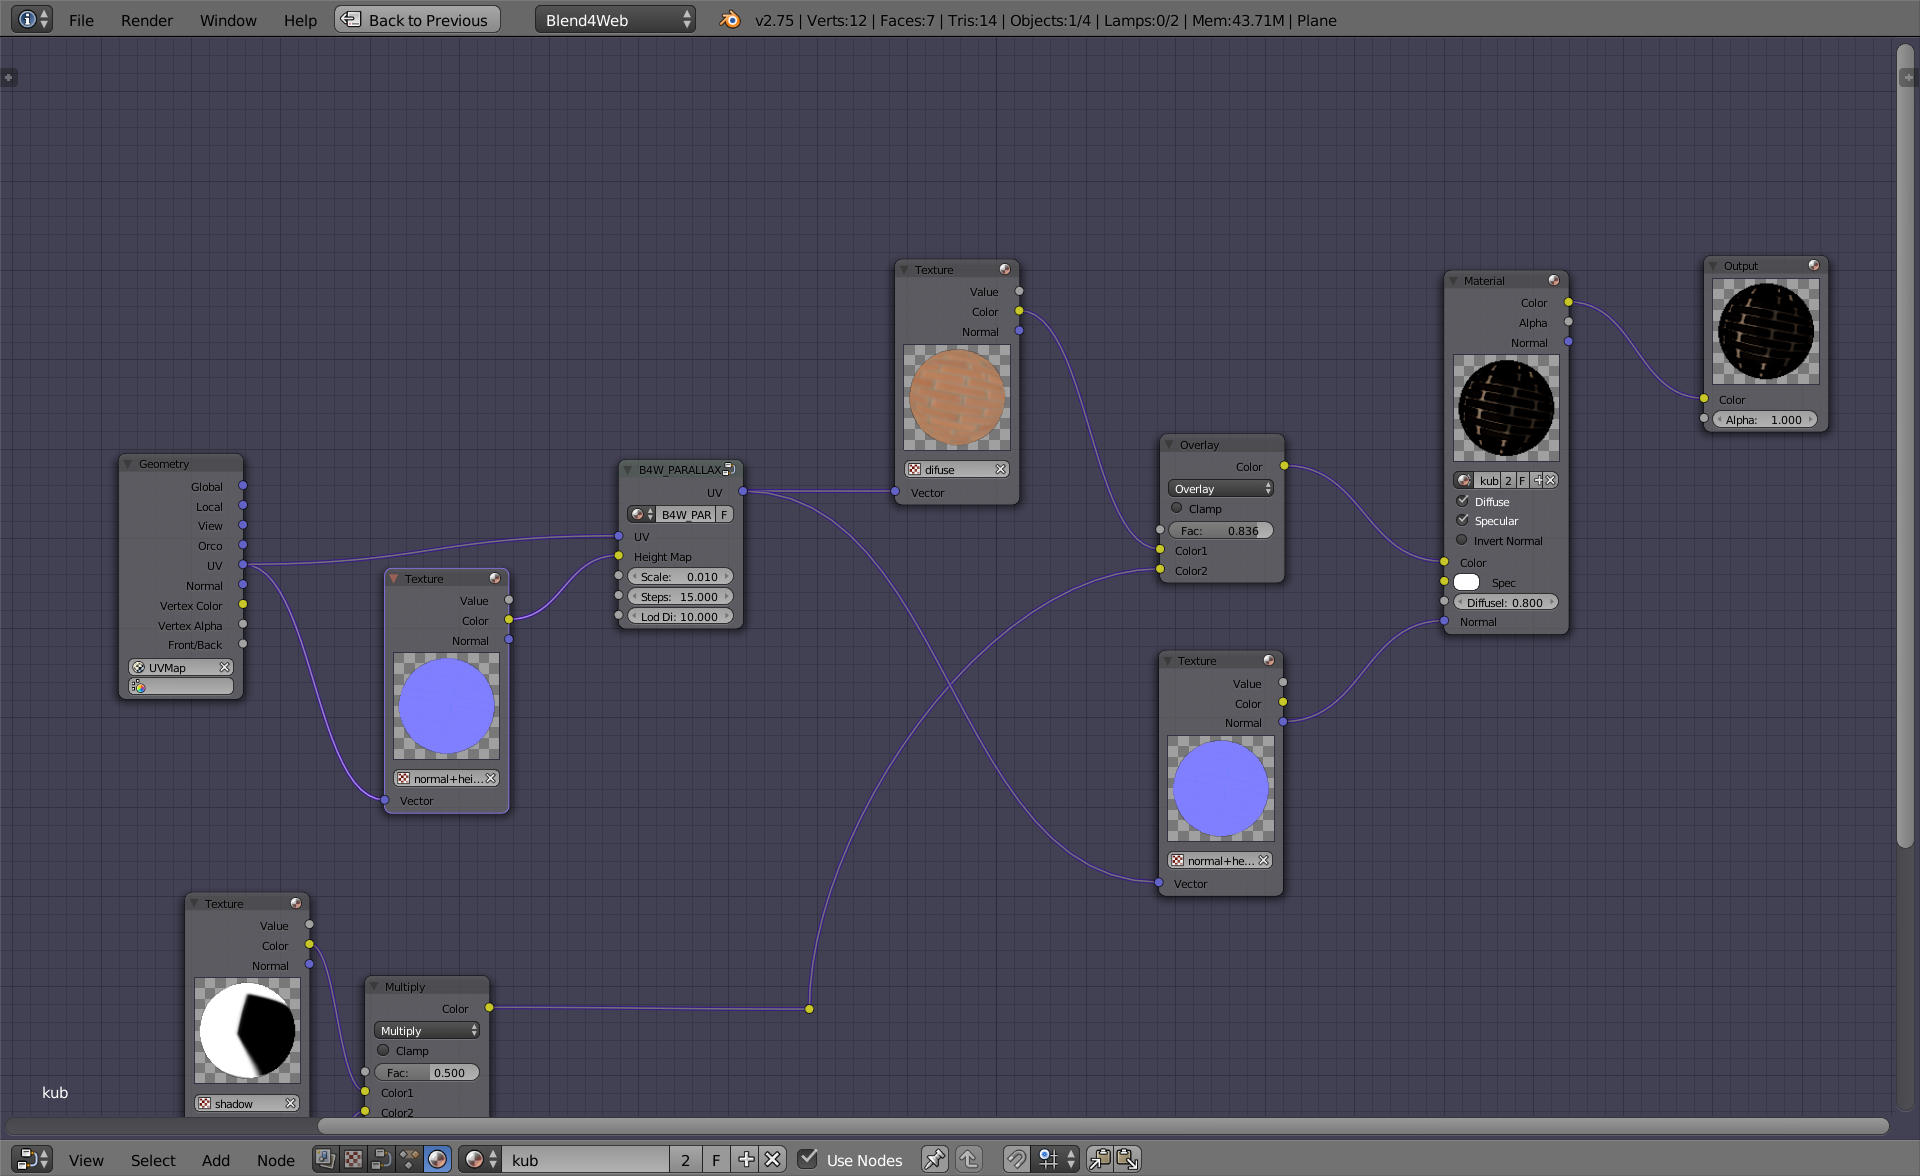
Подскажите, как подключить ноду B4W_PARALLAX для отображения этого эффекта?
Вот настройки параллакса в нодах:

Пока могут возникнуть проблемы с ним, это из-за развертки. Разбираемся)
Пока единственный 100% способ - найти сторону, на которой он будет отображаться корректно, и раздублировать ее. Также можно зеркалить UV-развертку сбоящих граней по разным осям, в итоге все должно заработать нормально.
Но, опять же, бага то вылезает, то прячется, так что, может, и не придется всего этого делать
Если что, вот файл, где все работает:
test_paralax_node.blend
21 September 2015 15:31
Thanks to _Yadoob_ French people can read B4W Wikipedia article in their native language!![smiling-open-mouth]()
But there are still soo many languages! And you are very welcome to translate this article to your native language, too![smiling-face-smiling-eyes]()
But there are still soo many languages! And you are very welcome to translate this article to your native language, too
21 September 2015 11:02
Looks like the texture is "stuck" - just add a new one and delete it![smiling]()
It happens when you delete the texture with shift, leaving it 0 users. So after reopening the file the texture will be missing, but the slot won't be deleted, it will just be empty. And Blender will do something like this
Here's a video, just in case
no_tex.mp4
It happens when you delete the texture with shift, leaving it 0 users. So after reopening the file the texture will be missing, but the slot won't be deleted, it will just be empty. And Blender will do something like this
Here's a video, just in case
no_tex.mp4
18 September 2015 14:19
18 September 2015 13:00
Hello and welcome to the forum! ![smiling]()
The overall answer is - yes, you can. The question is - when relative easiness ends and "relative difficultness" starts :)
I think it won't be so hard. I recommend using canvas textures: here you can see an example.
And about mapping: First, node material must be used. Right now it is possible to manipulate with two nodes: Value and RGB.
I made an easy node setup: size of texture mapping is controlled only with one Value node, so there won't be a problem to control it via sliders, for example. I highlighted some node inputs/outputs for easier understanding what goes where:
![]()
So, on first pic Value = 1, on the second Value =5:
![]()
About API method that can be used to set and control Value node you can read here. Also you can see here an example of using sliders.
Hope it helps!![smiling]()
UV_scale.blend
The overall answer is - yes, you can. The question is - when relative easiness ends and "relative difficultness" starts :)
I think it won't be so hard. I recommend using canvas textures: here you can see an example.
And about mapping: First, node material must be used. Right now it is possible to manipulate with two nodes: Value and RGB.
I made an easy node setup: size of texture mapping is controlled only with one Value node, so there won't be a problem to control it via sliders, for example. I highlighted some node inputs/outputs for easier understanding what goes where:

So, on first pic Value = 1, on the second Value =5:

About API method that can be used to set and control Value node you can read here. Also you can see here an example of using sliders.
Hope it helps!
UV_scale.blend
17 September 2015 10:31
16 September 2015 13:19


