Blend4Web: Beginner's Guide. Chapter 6: Life In Motion
2016-12-14
A well-crafted 3D model is a work of art in and of itself, but it can be even more expressive if fit with animation. A presentation should be dynamic, eye-catching and able to hold a viewer’s attention. And if a presentation is an interactive application, you simply cannot manage without animations!
Object Hierarchy
Let’s set the first task for ourselves – we need our models to constantly be spinning around after the application starts.
Creating animations in Blender is not that hard, but before starting, we need to properly structure all of our objects. Take our phone, for example. It consists of several separate shapes – the frame, the buttons, the camera eye and so on. Of course, it is easier to rotate one object then several independent ones. So we need to combine all of them into a hierarchy where one object will be the main one and the others will be secondary to it.
In our case, the frame of the phone should be the “parent” and its parts the “children”. To establish this relationship is an easy to do. First, select a “child” object in the scene, then hold down the Shift key and add the “parent” object to the selection, and then, press the CTRL+P keys. The Set Parent To context menu will appear. Select the Object option in the menu.
To make sure that the link is done right, let’s take a look at another Blender window.
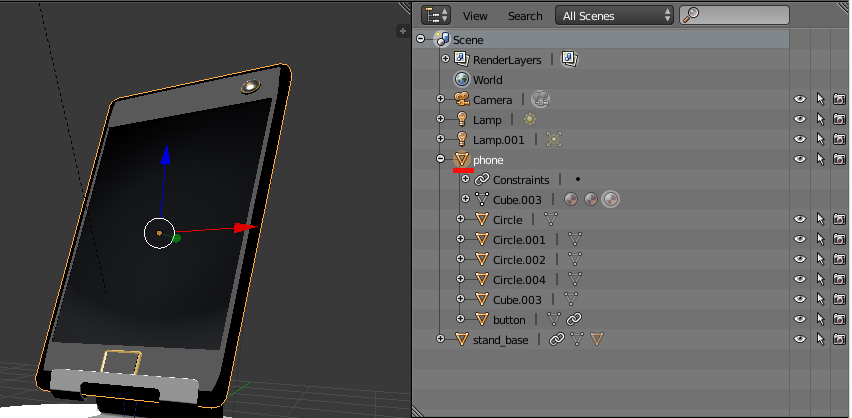
Figure 1
This is the Outliner window. By default, it is located at the top right part of the editor window, but, of course, you can open it in any other place as well.
The Outliner can be used to view the hierarchy of the scene objects represented as a tree-like structure. Take a look at Figure 1. As you can see, the frame of the phone is selected in the scene, so its name, Phone, is marked in the Outliner window. By clicking on the plus symbol next to the name, you can open an object’s personal tree. For example, the “Circle’, “Button” and other objects are all considered children of the Phone object.
You can do something like this yourself. If a link is incorrect, select the objects again and press the ALT+P keys. A menu will appear, and you can then select an option to break the link. And don’t forget another feature – like many other programs, Blender can undo your actions. The standard CTRL+Z key pattern is used for this.
By the way, just for the sake of convenience, it is advised to rename the scene objects into something that makes sense. The names like “Cube” or “Circle” are not informative. This can also be done in the Outliner window. Simply double-click the name of an object with the left mouse button.
Now that you know how to make links in Blender, you will have to do it for every object in the scene:
1. Join all parts of the phone together with the frame as the main object.
2. Join the parts of the holder.
3. Create an Empty object and set it as a parent for both the holder and the phone.
The parent object for the phone will allow us to create general animation for every phone object. The parent object for the holder will be useful to control the holder independently from the phone. And their common Empty parent can be used to control the phone and the holder at the same time.
An Empty object can be selected from the Add menu. Several types of such object can be found there. For example, you can choose a Plain Axis object. Remember though that all object from the Empty group are helper-type objects, so they are not visible in the render.
Look, I’ve placed my Empty beneath the holder.
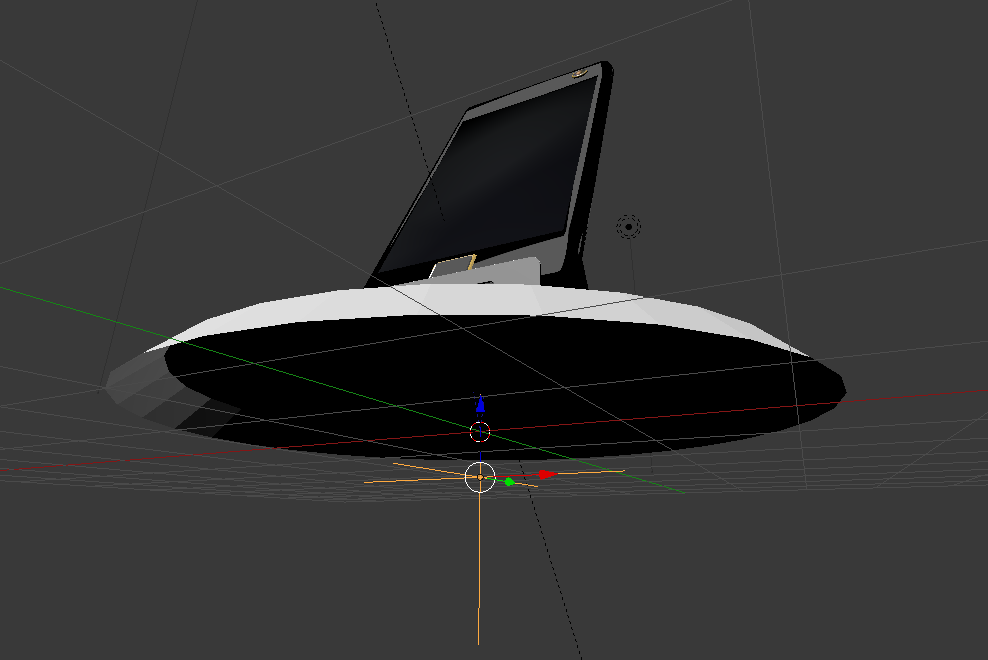
Figure 2
Preparing the Camera
You probably know what a scene camera looks like. If you don’t, find a Camera object in the Outliner window and select it. As a result, the program will mark the object you need.
A camera acts as your “eyes” in the scene. In a sense, you look at the scene using it. You can do anything you want with this object – rotate it, move or animate. To conveniently set it up, you can press the Insert (0) key on the numerical keypad, and the 3D View will switch to the camera you selected.
However, Blend4Web also adds its own settings for camera setup, and these settings are very useful for creating real-time applications. You have already tried to export your project to HTML, so you have probably noticed that you can use a mouse to navigate the scene in the Blend4Web player: you can zoom it in and out, pan, rotate and so on. In reality, though, the scene does not move, you only control the camera.
One of the strong points of the Blend4Web framework is the large number of templates that are available “out-of-the-box”. In many other engines, you have to manually write scripts to control camera behavior, but we are lucky as the developers have already done this for us.
Select a camera in the scene, switch to the Properties window and press the Camera button. Only don’t forget to switch to Blend4Web mode before doing this.
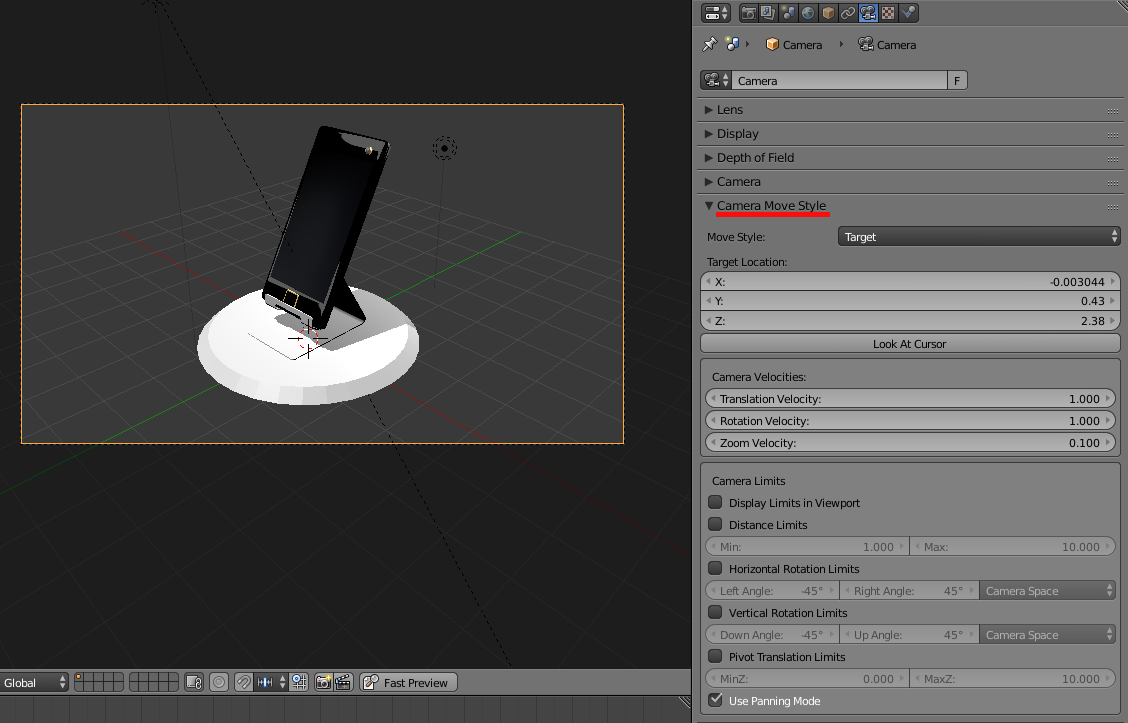
Figure 3
Find the Camera Move Style panel among the various camera settings. All camera movement templates are stored here. Any of them can be selected from the Move Style menu:
Target is the default option. The camera is set to follow a specific point in the space of the scene. You can move and rotate the camera as you like, but this “target” point will always be in the center of the picture.
Static. The camera always remains in the same position in which you left it in Blender.
Eye is first-person mode.
Hover. In this mode, the camera moves parallel to a reference plane.
To better understand how these options work, I suggest you experiment with them on your own. And for our presentation, just set the Static mode.
So, our camera will be static. This means that we have to set it in the right position in advance. I’ve decided to go with the view of the front side of our smartphone.
Of course, you can move the camera using methods you are already familiar with, but let’s discover yet another way of doing this.
Blender has a certain panel in the 3D View window that contains settings for a current object and for basic window tools. This panel is usually hidden by default, but you can make it appear by pressing the N key (fig. 4).
Take a look at the Transform panel. Here, you can set the exact coordinates, rotation angles and scales of an object.
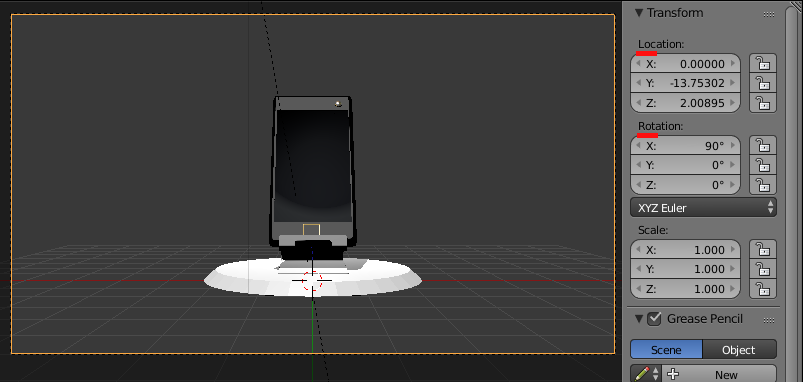
Figure 4
Creating Animations
Animation in Blender is a vast and relatively complex theme that features dozens of tools, several integrated editors and different approaches.
Does this scare you? It shouldn’t, as we will learn the simplest and most effective method known as object animation.
Anything you do in the 3D View window, including moving objects, rotating and scaling them, can be done as animations. Moreover, you only have to set the initial and the final states of the object, and the program will calculate in-between frames itself. These object states are called key frames.
Key frames are created for every type of animation, and they can be manipulated in the same way as regular Blender objects. You can create and delete them, copy them and move them across a timeline.
For the sake of convenience in working with animation, Blender developers prepared a specific window layout called Animation that contains the most frequently used tools.
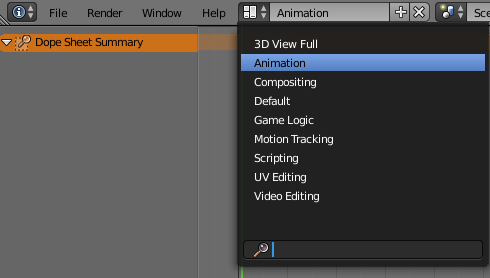
Figure 5
We are already familiar with some of the windows such as 3D View, Outliner and Properties. Let’s add another entry to this list.

Figure 6
This is the Timeline window. You can control animation and its playback by using it. Global playback parameters are set in the Start and End options. The fragment of the timeline assigned by these parameters can be played by pressing the ALT+A hot keys. You can also use dedicated buttons located at the Timeline panel to control playback. On top of this, there is a green-colored cursor in the window. By moving it, you can set a specific frame of the animation.
Options for creating animation can be found a little further and among them stands out a bright red button. By pressing it you can enable automatic animation recording mode that is very convenient to use:
1. Move the green cursor to a frame you want.
2. Manipulate the object you need.
And then repeat. This method is very convenient, but it results in unnecessary animation keys. Because of this, we will work in manual mode.
So, our first animation will be a constantly rotating holder with the phone. Of course, we will only animate the Empty object, so select it in the scene.
Set the green cursor in the Timeline window to frame 1. Move the mouse to the 3D View window and press the I key. The program will show the list of all animation keys available for this object. Select the Rotation key. Please take a note that after you do this, a yellow mark will appear on the timeline. It represents the animation key that has been set.
Move the cursor to frame 60 (you can type the frame number in the text field that is located near the End option). Now we have to set another Rotation key. But before this, we need to rotate the Empty object along the Z axis.
You can do this either by using the rotation tool (the R key) or by changing the parameter in the additional panel that can be accessed by pressing the N key. The second method is preferable.
As the initial Z value for our object is zero, we will use the second value of -360 to make a full turn. After that, open the key menu once again and set another Rotation.
Try to play the animation by pressing the ALT+A keys. Take a notice that the playback cycles between the frames set in the Start and End parameters. So it would be logical to set the End value to 60.
You have probably noticed the fact that the rotation speed is not uniform. It increases at the start and decreases at the end. This is not a bug, but the program’s attempt to make your life easier, because, as laws of physics state, every movement starts with acceleration. But in this case we need a constant movement with a constant speed.
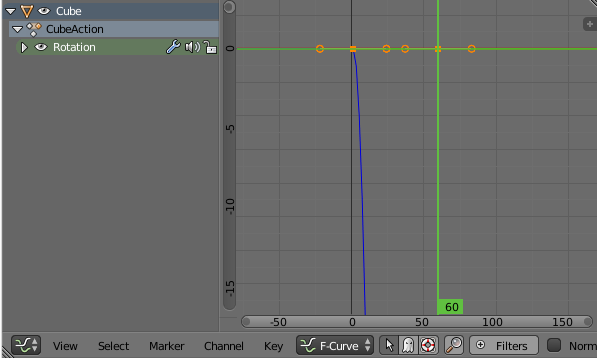
Figure 7
In Figure 7 you can see another additional editor known as Graph Editor. There, animation keys are represented as curve vertices. By editing them, you can adjust an animation for your purposes.
Note that the Z axis rotation animation (blue curve) is not linear. You can clearly see that acceleration exists with this object. To make Empty rotate evenly, we have to rectify this curve.
You can do it manually, by using “levers” at every vertex, but it will be faster and more convenient to perform this in automatic mode. Select all keys (the A hot key) in the Graph Editor window. Open the Key | Handle Type menu and select Vector in it.
If you have done everything as planned, then you have my congratulations, as your first Blender animation is complete.
To make animation play automatically at the start of the application, we need to enable certain options. Select the Empty object in the 3D View, open the Object tab in the Properties window and find the Animation panel. Check the box in the Apply Default Animation option. You can also set the animation mode in the menu nearby. Select the Loop option (cyclic playback) . Now you can export the scene to HTML and make sure everything is working fine.
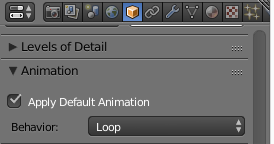
Figure 8
You have probably noticed that the rotation is very fast. The length of 60 frames (about two seconds) is not enough, but this can be fixed easily.
You can move the end key in the Graph Editor window. However, this editor is intended for fine-tuning the animation. It is more convenient to work with keys in another window.
The editor you need is called Dope Sheet and by default is located in the upper left of the Blender window.
There, all object keys are shown as dots. You can select one or several of them and move them to a place you need. You can even edit keys without stopping animation playback. Try it, and you will see how easy and convenient it is to adjust animation in Blender (fig. 9).
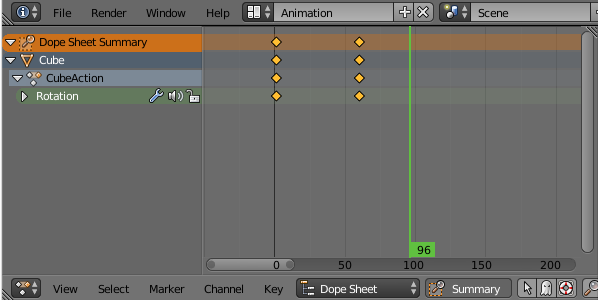
Figure 9
And, in conclusion, I’ll give you a little homework. Create an animation of the holder sliding down and out of the field of view. To do this, use Location keys.
I have no doubt that you can do it!
Updated source files can be found in the Blend4Web SDK starting from version 16.12 (this applies to both CE and PRO versions). The files are located in the blend4web/blender/tutorials/basic/for_beginners folder.

