Blend4Web: Beginner's Guide. Chapter 2. Modeling Basics
2016-10-19
Do you remember your first lessons at driving school? Unaccustomed, you were afraid to even touch the wheel or to hit the wrong pedal, and, at first, the instructor was making you sit in the car just changing gears. We, too, will start from the basics. Some people say that Blender is hard to learn, but eventually, you did learn how to drive, didn't you?
Meet the 3D View
This is what you see when you start the program.
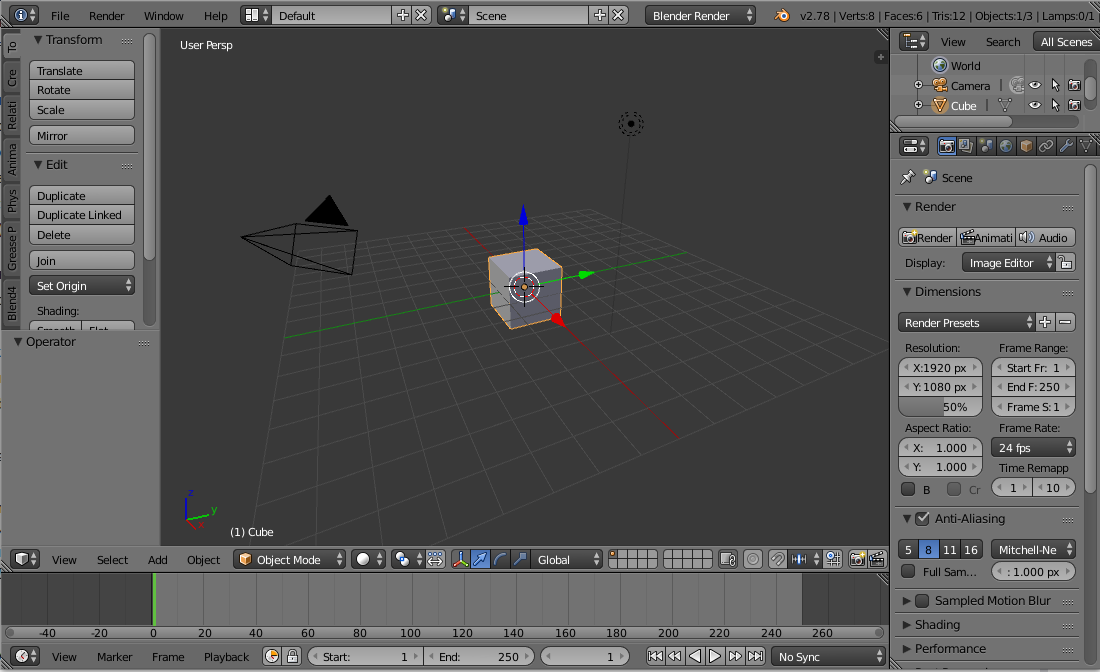
Figure 1. Main Blender screen.
The biggest window is where the scene and all its objects are shown. Here you can create, move, combine everything you need in any possible way. This your main space for creativity.
To start working, you need to memorize several simple navigation rules. Let's take a look at some hypothetical questions a beginner could ask:
I want to rotate the scene! Well, nobody prohibits you from doing that. All you have to do is to hold the middle mouse button. By the way, while holding the Shift button and then the middle mouse button, you can pan the scene.
And what about zooming in or out? Try using the scroll wheel.
I've rotated it a bit too much and am now left with an empty screen. There is a "magic" button on the numerical block, the one on your right. Press Del (point) button, and the program will bring the selected object to the center of the screen.
How do I select things? I'm clicking the screen with the left mouse button, but it just moves some "target scope". That's a peculiarity in Blender. To select any object in the scene, you have to use the right mouse button. After that, the selected object will be outlined orange. And this "target scope" is a very important pointer used for modeling, and we will get to it another time.
As you can see, main scene view controls are very simple. But to model effectively, you also need to memorize several additional "hot keys", because we are working in three-dimensional space. All the keys you need are located on the numerical block:
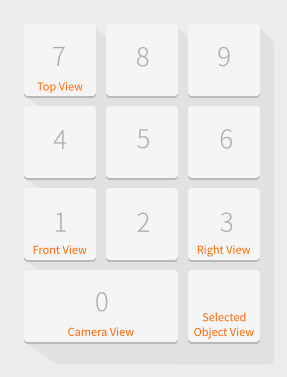
Figure 2. Navigation with numpad.
Front (front view) — the 1 button.
Top (the top view) — the 7 button.
Right (right view) — the 3 button.
Camera (view from the camera) — the 0 button.
And now let's take a look at the upper left corner of the window. For convenience, Blender shows information regarding the current view mode there, so you won't get lost (Front Persp, Right Persp, etc).
But wait… you didn't even run Blender yet and are hoping to manage only with the screenshots from this lesson? That won't work, fellas. There is only practice ahead of us.
Creating the Base Form
Take a look at the Figure 3. At the left we have a complete form of the mobile phone that, I hope you will be able to create by yourselves after you finish this lesson. And at the right we have a simple cube. Only for us, it's no cube, it's a template. Do you know, why Blender already has this shape at the center of the screen right after starting?
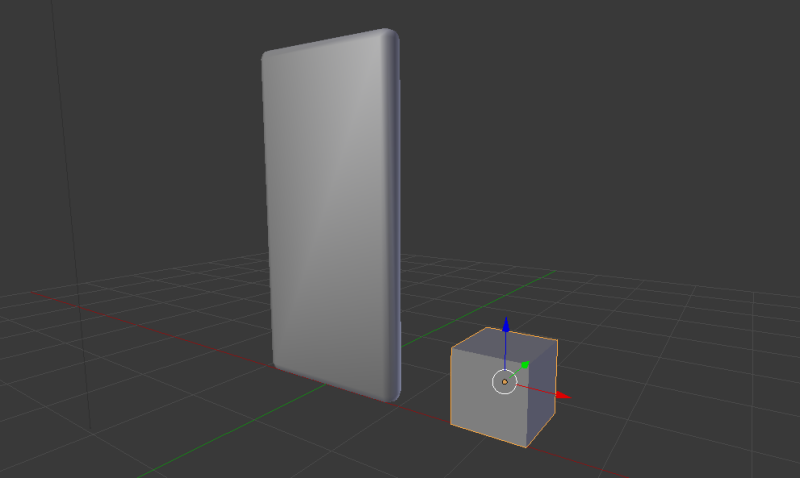
Figure 3. From Cube to Mobile Phone.
That's because the majority of artists prefer to work with this particular initial shape. After all, you can make anything out of a cube, even turn it into a sphere. Although there are shapes more suitable for creating spherical objects in the Blender tool-set.
The developers took into account what users prefer, and prepared a cube for us beforehand to ease the workflow. This exact cube has been used as a base for an elegant form that is placed beside it in the picture.
Every object in three-dimensional space has three important characteristics: coordinates (location), rotation angles and scale. By modifying these parameters, an artist creates his scene. So our task is to change the proportions of the cube in a way that will make it look like a mobile phone.
Blender offers different ways to manipulate an object. For now, we will take a look at the simplest way.
If you take a closer look at the cube in the first picture, you will notice colorful arrows originating from its center. It's easy to guess that each one of them corresponds to an axis in the three-dimensional space known as XYZ. Now, try to "grab" any of them with a mouse cursor (left button) and drag your object sideways.
Yes, that's the simplest way to manipulate objects that Blender offers. And to change the action, there is a dedicated panel at the bottom of the window, where you can select any manipulator you need (fig. 4).
Can you guess how I made the basic shape?
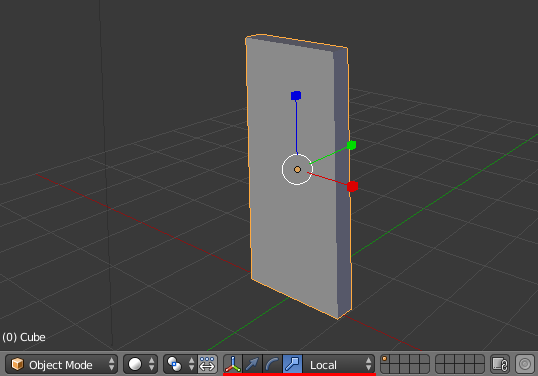
Figure 4. Scale manipulator.
There is nothing difficult here. Turn on the scale manipulator, as shown at the Figure 4, and, by moving the pieces you need, give the form you need to the shape.
Noble Contours
What you've got is a cuboid that only roughly resembles a mobile phone. Now you need to somehow make it appear more "noble", add some elegant features to it. So that's what we will do now.
In the Blender tool-set, there are some interesting instruments that allow you to change an object while retaining its true form. Imagine a layered cake, where lots of tasty things are place on top of the basic shortcake. And as a result it looks completely different, although its base remains the same. In Blender, this is called modification, and the instruments themselves are known as the modifiers.
Modifiers are located in a dedicated panel in another Blender window known as the Properties window. It is the most important window in the entire program, where most of the scene and object settings can be found. For convenience, all of them are situated in different panels that you can switch by pressing the buttons with pictures on them at the top of the window. The modifiers are hidden under the button with a stylized screwdriver. But don't forget to select your cube first!
You will find a single button with the corresponding name of Add Modifier. Press it, and behold the treasures of its "inner world"! (fig. 5)
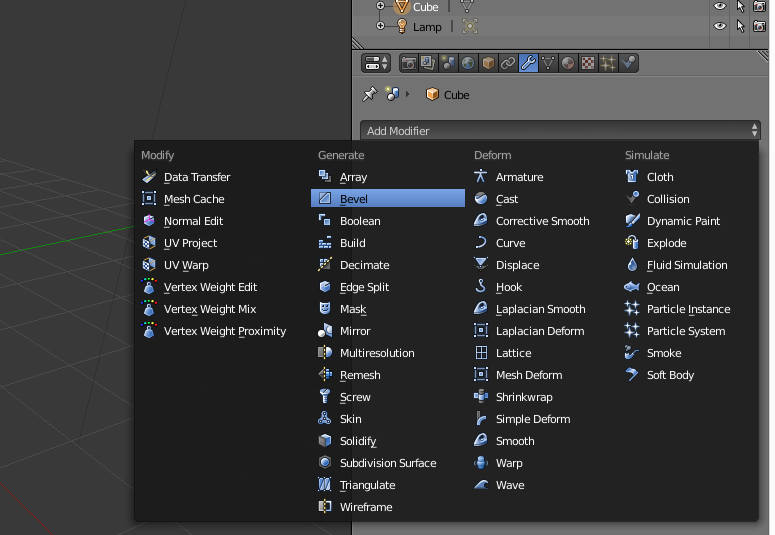
Figure 5. The list of modifiers.
There are dozens of functions for the most various tasks: deforming objects, controlling animation, physics, textures and lots of other stuff. But for now, we will need only one modifier: Bevel. It is pointed out in the picture.
This remarkable instrument gives us the means to, well, bevel the edges of an object and to create so-called chamfers. In our case, you need to change the Segments parameter that controls the number of segments while beveling (fig. 6).
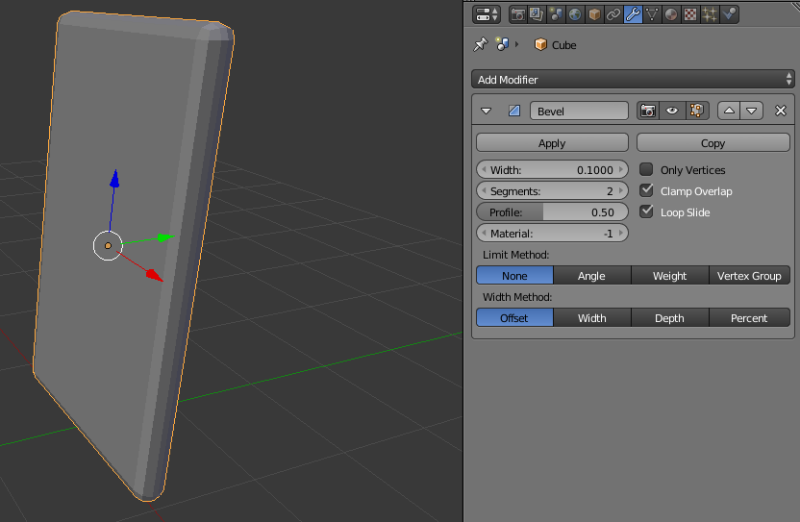
Figure 6. Bevel modifier in action.
Each one of the modifiers has its own unique settings, but there are also settings that are common for all of them. I'm talking about the control elements. Usually, they are located in the upper part of the settings tab, beside the title. Now, we have to digress a little, and talk about them.
You can use an unlimited amount of modifiers on an object. And the order in which they are applied is very important here. The buttons with arrows on them help you to move a modifier up or down in the list.
The buttons with a camera and an eye, located nearby, are for controlling how the modifier will work in the viewport and in the final render, respectively. And the Apply button allows you to permanently apply all the modifications and to remove the modifier from the list.
So, you have added the Bevel modifier to your model. You have copied all the settings from Figure 6, but the object still looks somewhat off.
Remember one very important rule! For many instruments to work correctly, you have to apply the object's scale after transforming it. This can be done in the Object menu of the 3D View window. Select the Apply | Scale parameter. Now, the Bevel modifier will work perfectly.
The last touch will be turning on smoothing for an entire model. The Smooth function does not change the shape of an object, it produces its effect by fiddling with lights and shadows. But with it, the model will look more convincing. Find the button with the same name (in the instrument panel to the left of 3D view) and turn it on.
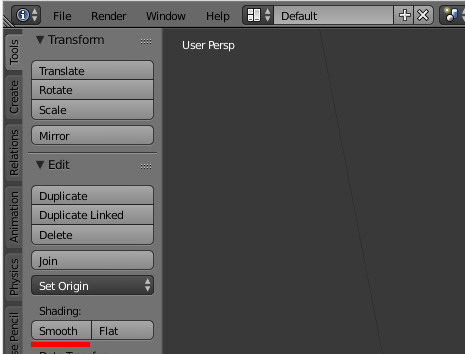
Figure 7. Enabling smooth shading.
Exporting to Web
We already tried to export our application to WebGL during our previous lesson. That was very fast and simple, but there is also another way that is much more convenient for testing intermediate results, in particular.
Blend4Web is closely integrated with Blender. It understands scene settings, object properties and lots of other things just fine. However, being a real-time engine, it has parameters and settings of its own. All of them can be found in the Blender panels. But to make them visible, you need to turn on a special compatibility mode.
Note the program's window header. There is a collapsing menu called Engine, where you can select the render engine that the program will use. Open it and select Blend4Web (as shown at the fig. 8). Now, if you look closely at the Blender panels, you will notice new options and settings.
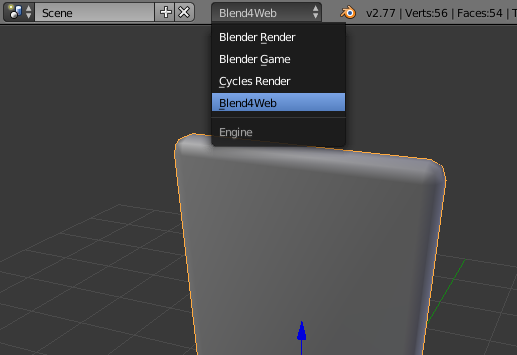
Figure 8. Switching to Blend4Web mode.
For a model to be rendered correctly in a web browser, you need to apply the modifiers, but doing so is not always convenient.
Blend4Web developers provided us with an excellent option that does it "on the fly" while exporting the scene, thus eliminating the need to apply the modifiers.
Select your model, open the Object panel in the Properties window (a button with a cube on it) and look for the Export Options tab. Enable the Apply Modifiers, as shown in fig. 9.
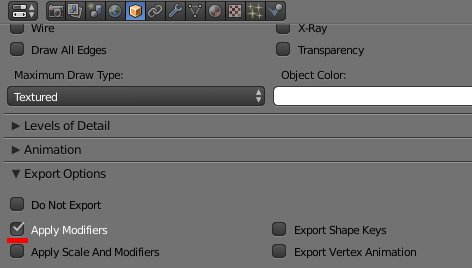
Figure 9. Apply Modifiers option.
And the last thing. For checking results at any moment, there is a Fast Preview button, which can be found at the bottom of the 3D View window. The program will perform the export and immediately open your scene in a dedicated web application that is literally stuffed with testing tools – but we'll talk about that next time.
And for now, I recommend saving your project (File | Save), and congratulations — you have learned the basic principles of modeling with Blender!

