User posts Mentalist
18 March 2016 16:05
18 March 2016 09:15
Update
Regarding cases like with the cylinder, I have found that an easy way to get sharp edges without complicating the normals is to simply mark the edges as "Sharp".
Actually, it turns out that my solid cylinder's edges had all been marked as sharp. I don't remember doing it, but I must have. I was happy to discover that by just clearing the "Sharp" marking on the edge ring I got exactly the shading I wanted, without needing to separate the geometry.
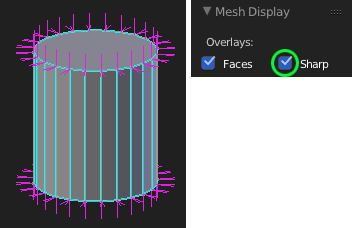
In summary - I found I had Sharp edges I didn't intend for:
![]()
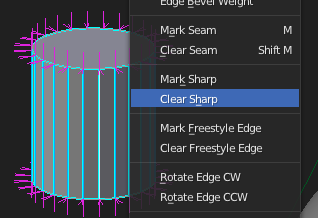
I cleared the ones I didn't want:
![]()
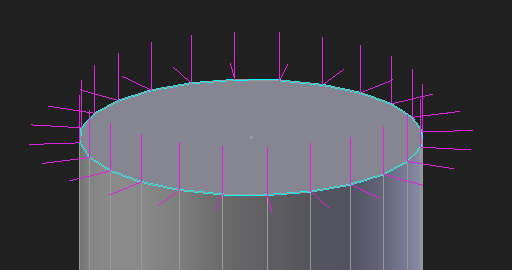
My cylinder's shading was fixed!![smiling-eyes]()
![]()
Regarding cases like with the cylinder, I have found that an easy way to get sharp edges without complicating the normals is to simply mark the edges as "Sharp".
Actually, it turns out that my solid cylinder's edges had all been marked as sharp. I don't remember doing it, but I must have. I was happy to discover that by just clearing the "Sharp" marking on the edge ring I got exactly the shading I wanted, without needing to separate the geometry.
In summary - I found I had Sharp edges I didn't intend for:
I cleared the ones I didn't want:
My cylinder's shading was fixed!
17 March 2016 13:26
Thank you, Mikhail.
After reading your reply, I realized I can get the desired result on the solid cylinder by separating the faces on the top and bottom from the rest of the mesh. (Although it's still a mystery to me why my hollow cylinder does not require that.)
![]()
As for the icosphere-pill object, by applying the Mirror Modifier and then clicking "Restore" I was able to get the top to match the bottom.
The information you provided enabled me to find workarounds to these limitations. Thank you!![grinning]()
After reading your reply, I realized I can get the desired result on the solid cylinder by separating the faces on the top and bottom from the rest of the mesh. (Although it's still a mystery to me why my hollow cylinder does not require that.)
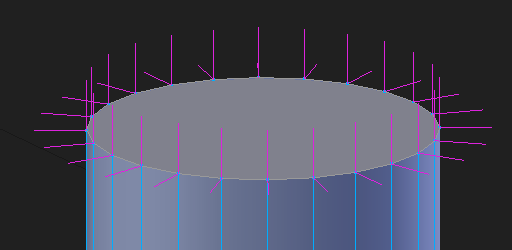
As for the icosphere-pill object, by applying the Mirror Modifier and then clicking "Restore" I was able to get the top to match the bottom.
The information you provided enabled me to find workarounds to these limitations. Thank you!
17 March 2016 12:43
Thank you, Yuri.
I took a look at the links you shared. I don't think what I'm talking about qualifies as "vertex animation" because the vertices in mine are not "moving", they are being completely swapped out in each frame.
(I could be misunderstanding the definition of "vertex animation" though.)
In the flag example, the vertices are changing location, but it's the same set of vertices - the same mesh.
To demonstrate what I mean, I have constructed a demo scene of a simple fluid sim.
Download the source .blend
View the compiled .html
![]()
Since the mesh must actually be a different mesh in each frame, the only way I knew how to do that was by using a series of Show/Hide nodes in the Logic Editor. But then many objects are required, and each object must have the same settings. Managing many objects as if they are one is not very elegant, so my question is: is there a better way to do this than the way I did it? (Hopefully a way that allows many meshes to be cycled through inside one single object.)
Thank you for your help!
I took a look at the links you shared. I don't think what I'm talking about qualifies as "vertex animation" because the vertices in mine are not "moving", they are being completely swapped out in each frame.
(I could be misunderstanding the definition of "vertex animation" though.)
In the flag example, the vertices are changing location, but it's the same set of vertices - the same mesh.
To demonstrate what I mean, I have constructed a demo scene of a simple fluid sim.
Download the source .blend
View the compiled .html

Since the mesh must actually be a different mesh in each frame, the only way I knew how to do that was by using a series of Show/Hide nodes in the Logic Editor. But then many objects are required, and each object must have the same settings. Managing many objects as if they are one is not very elegant, so my question is: is there a better way to do this than the way I did it? (Hopefully a way that allows many meshes to be cycled through inside one single object.)
Thank you for your help!
16 March 2016 10:23
Blend4Web's Normal Editor is a great feature, but sometimes I get stuck with shading I can't seem to fix.
Case 1: Normals that won't go back …to "normal"![unamused-face]()
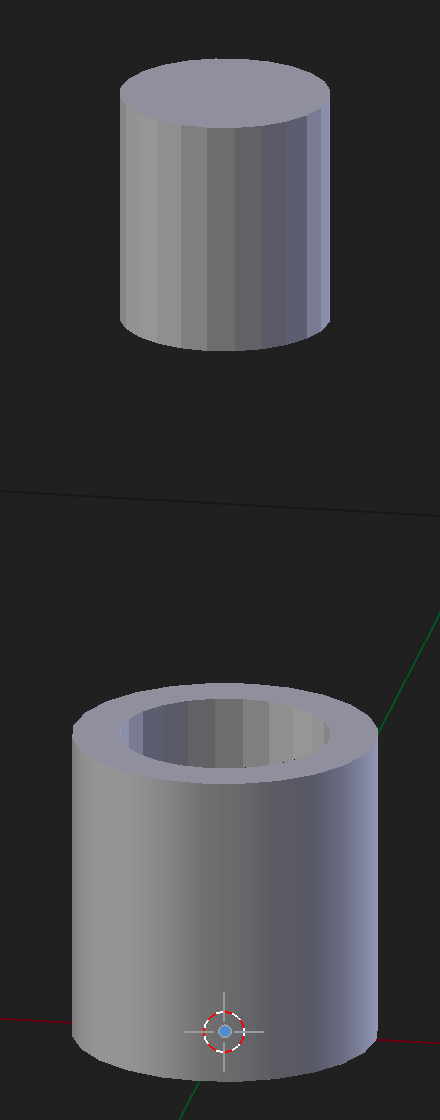
For example, here is an object made up of two cylinders. A smaller solid one and a larger hollow one.
On the hollow one, the normals are exactly as they should be (on the outside, never mind the inside).
So the top and bottom look like flat faces, and the edge ring that goes around is looking smooth.
But for some reason, on the solid cylinder I cannot get the same effect.
![]()
Upon viewing the normals, it is apparent that the splitting is the cause of the problem.
I want there to be splitting on the edge loops that define each cap of the cylinder. But I don't want splitting on the edge ring that goes around the cylinder.
![]()
I can press "Restore" while Split Mode is OFF, but then I lose the flat shading on the top.
I can press "Restore" while Split Mode is ON, but then I lose the smooth shading on the edge ring.
I can't win.
I can "Clear Custom Split Normals Data" but then I lose my work on the hollow cylinder, which is looking OK.
(I know I can Separate the mesh, but this shouldn't be necessary each time I encounter this problem.)
What's really strange is, I tried to Copy and Paste the normal data from the vertices of the hollow cylinder to those of the solid one, but even that method didn't work as expected.
Case 2: Inconsistency when mirrored![confounded]()
I have this icosphere that I've elongated into a sort of pill shape. The original geometry is on the bottom, and the Mirror Modifier result is on the top (mirrored on Z).
If the Mirror Modifier makes an exact flipped copy of the geometry, this shouldn't happen, right?
![]()
Could it be a bug with Blender's custom normals (Auto Smooth) feature? A bug with B4W's Normal Editor? Or am I just using it wrong?
Thanks in advance for any help!
Example .blend file
Case 1: Normals that won't go back …to "normal"
For example, here is an object made up of two cylinders. A smaller solid one and a larger hollow one.
On the hollow one, the normals are exactly as they should be (on the outside, never mind the inside).
So the top and bottom look like flat faces, and the edge ring that goes around is looking smooth.
But for some reason, on the solid cylinder I cannot get the same effect.
Upon viewing the normals, it is apparent that the splitting is the cause of the problem.
I want there to be splitting on the edge loops that define each cap of the cylinder. But I don't want splitting on the edge ring that goes around the cylinder.
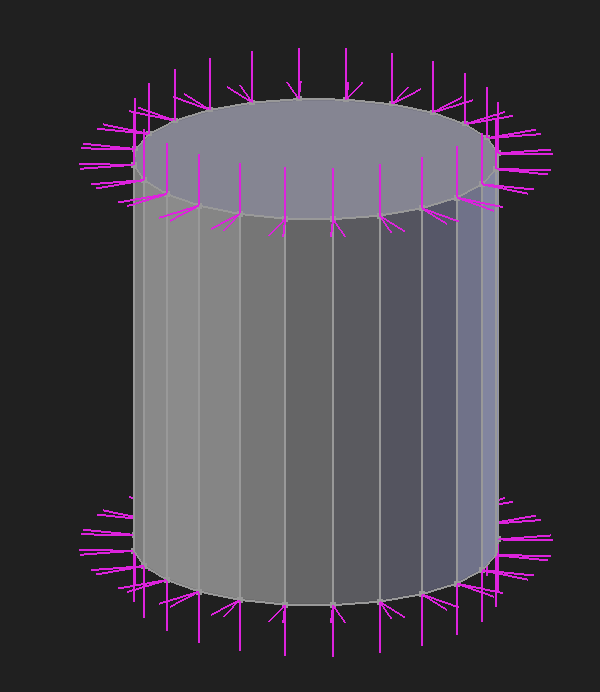
I can press "Restore" while Split Mode is OFF, but then I lose the flat shading on the top.
I can press "Restore" while Split Mode is ON, but then I lose the smooth shading on the edge ring.
I can't win.
I can "Clear Custom Split Normals Data" but then I lose my work on the hollow cylinder, which is looking OK.
(I know I can Separate the mesh, but this shouldn't be necessary each time I encounter this problem.)
What's really strange is, I tried to Copy and Paste the normal data from the vertices of the hollow cylinder to those of the solid one, but even that method didn't work as expected.
Case 2: Inconsistency when mirrored
I have this icosphere that I've elongated into a sort of pill shape. The original geometry is on the bottom, and the Mirror Modifier result is on the top (mirrored on Z).
If the Mirror Modifier makes an exact flipped copy of the geometry, this shouldn't happen, right?
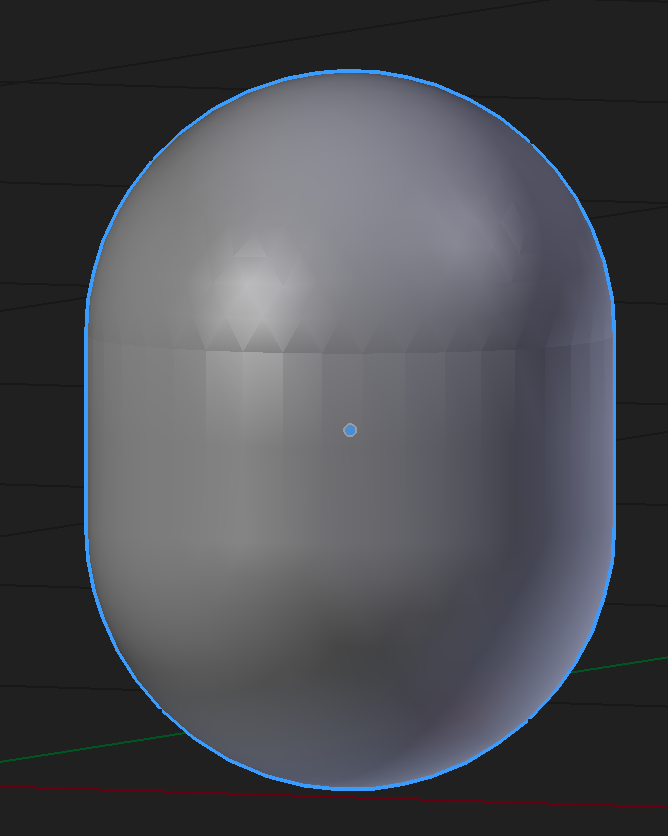
Could it be a bug with Blender's custom normals (Auto Smooth) feature? A bug with B4W's Normal Editor? Or am I just using it wrong?
Thanks in advance for any help!
Example .blend file
16 March 2016 02:56
Is there a way in Blend4Web to have an object that changes its mesh data in each frame?
An example of such an object would be a fluid sim (low poly, of course), or other object that dynamically changes topology. I'm fairly sure this will require baking, but assuming we have baked meshes, then is there a way to do this?
Thanks.
An example of such an object would be a fluid sim (low poly, of course), or other object that dynamically changes topology. I'm fairly sure this will require baking, but assuming we have baked meshes, then is there a way to do this?
Thanks.
11 March 2016 05:31
Thank you for that info! In my case Overview Outlining Mode is not being enabled/disabled depending on my B4W Render settings.
I do this in Blender:
![]()
But I see this in the Viewer:
![]()
Unless "Object Outlining" and "Overview Outlining" mean two different things?
I realized that when I do File > Export > Blend4Web (.html) that it displays as expected. So maybe it is just that the Viewer's settings for outlining are independent from those of the .blend?
I do this in Blender:

But I see this in the Viewer:

Unless "Object Outlining" and "Overview Outlining" mean two different things?
I realized that when I do File > Export > Blend4Web (.html) that it displays as expected. So maybe it is just that the Viewer's settings for outlining are independent from those of the .blend?
10 March 2016 01:37
I have a scene with only one object that I want to be selectable, and when it is selected I would like it to momentarily show a glowing outline.
The problem is that whether I set it to ON, OFF, or AUTO, I still get outlines on everything.
![]()
I've also tried turning off Object Selection, just to see if it made a difference. It did not.
![]()
The one object that I do want to be selectable has these settings:
![]()
Any ideas?
Thanks.
The problem is that whether I set it to ON, OFF, or AUTO, I still get outlines on everything.

I've also tried turning off Object Selection, just to see if it made a difference. It did not.

The one object that I do want to be selectable has these settings:
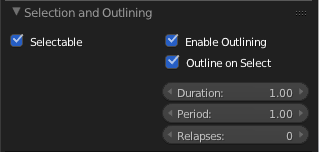
Any ideas?
Thanks.
10 March 2016 01:18

