Logic Nodes and JavaScript
2017-07-27
Blend4Web features an outstanding visual logic editor which you can use to develop programs without even leaving Blender. This is enough for projects of lesser complexity. However, you can do so much more with JavaScript with its direct access to the engine API.
This brings us to the question: is there a way to combine the simplicity of visual programming with sheer power of the JavaScript code? And, as it turns out, there certainly is. The developers of Blend4Web have provided us with such an option. So why don’t we take a look at it?
Node-Based Logic
The main element to connect node logic with JavaScript is the JS Callback node. This node is used to call a specified function from the program code and to pass parameters to it. As the function performs its work, JS Callback patiently waits for it to finish. After the task is complete, the function returns control back to the JS Callback node, and the logic node chain continues its work.
Let’s take a look on a most simple example of an interaction like this.
Let’s assume that our scene contains an object that should run a certain function when selected. The code of the function will also receive a text message, something like “Hello World!”… or maybe “Hello Script!” will be more appropriate.
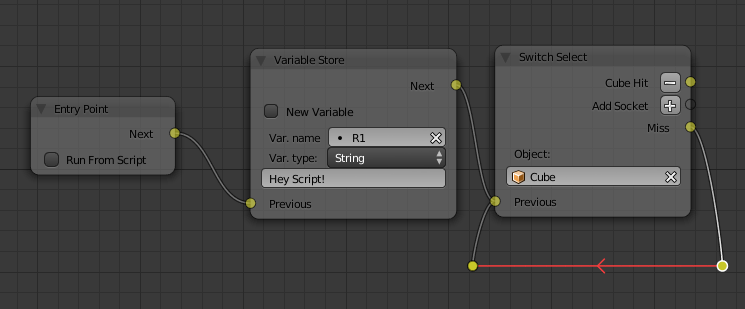
First, let’s make a logic chain that creates a variable and monitors if the object is selected.

This is a very simple logic setup. First of all, it initializes the R1 register and assigns the “Hello Script!” text as its value. After this, the control is passed to the Switch Select node that waits for the object Cube to be selected. If it is selected, control is passed to the next node; if it isn’t, the node continues to wait.
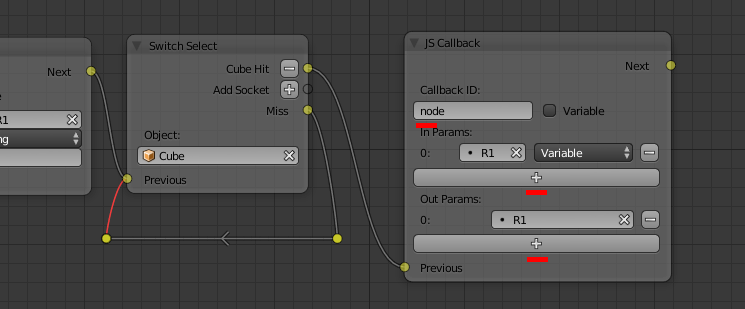
The next stop is the JS Callback node itself!

First, we need to specify the name of the function that the node will call. This should be done in the Callback ID field. If you need some data to be passed to the function, you should add it to the In Params field.
Each variable occupies a separate slot; slots can be added with the “+” button. JS Callback can pass not only variables, but entire scene objects as well (in the form of arrays). In our case, we need to set the R1 register in the first slot.
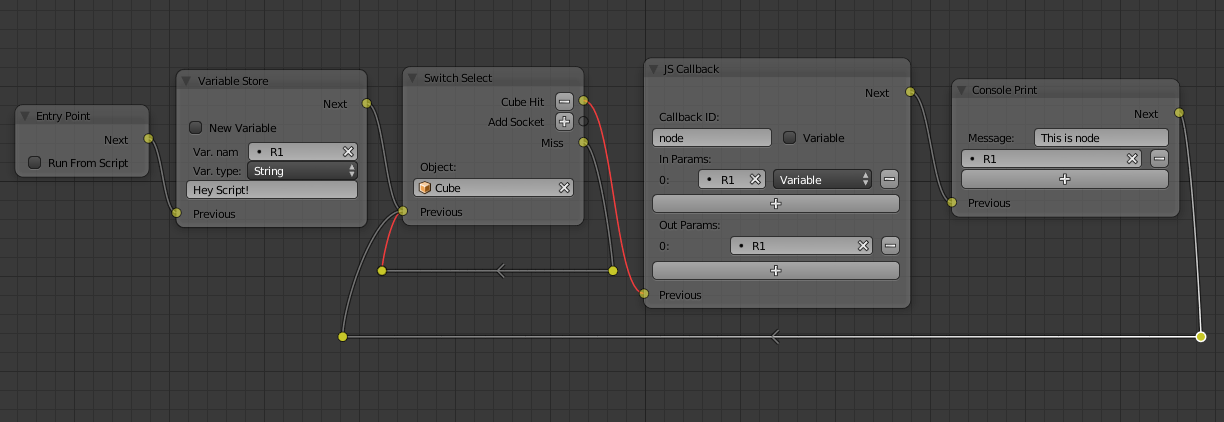
Now, let’s assume that the JS Callback node has finished its work and received some output from the function it called. Now, just to be sure, let’s output the value of the R1 register to the browser console using the Console Print node.
The complete logic node setup should look like this:

JavaScript Code
As a specific module is required for JavaScript and node logic to interact, we have to import this module first.
var m_logic = require("logic_nodes");
Now, let’s register our function. This should be done before the scene itself is loaded:
m_logic.append_custom_callback("node", node_cb);
As you can see, it has the “node” identifier that has been mentioned in the JS Callback node, and the name of the function as well.
And here is the function itself:
function node_cb(input, output) {
    console.log (input[0]);
    output[0] = "Hey Logic!";
}
Note that the JS Callback node passes and receives values as an array. The Input[0] variable here contains the value of the R1 register that will be shown in the browser console. Then, the function returns output[0] with some text message.
The JS Callback node receives the result, while the next node Console Print outputs the text to the browser console.
And here is the complete listing of the script:
"use strict"

// register the application module
b4w.register("logic_nodes_js_main", function(exports, require) {

// import modules used by the app
var m_app       = require("app");
var m_cfg       = require("config");
var m_data      = require("data");
var m_preloader = require("preloader");
var m_ver       = require("version");
var m_logic     = require("logic_nodes");

// detect application mode
var DEBUG = (m_ver.type() == "DEBUG");

// automatically detect assets path
var APP_ASSETS_PATH = m_cfg.get_assets_path("logic_nodes_js");

/**
 * export the method to initialize the app (called at the bottom of this file)
 */
exports.init = function() {
    m_app.init({
        canvas_container_id: "main_canvas_container",
        callback: init_cb,
        show_fps: DEBUG,
        console_verbose: DEBUG,
        autoresize: true
    });
}

/**
 * callback executed when the app is initialized
 */
function init_cb(canvas_elem, success) {

    if (!success) {
        console.log("b4w init failure");
        return;
    }

    m_preloader.create_preloader();

    // ignore right-click on the canvas element
    canvas_elem.oncontextmenu = function(e) {
        e.preventDefault();
        e.stopPropagation();
        return false;
    };
    m_logic.append_custom_callback("node", node_cb);
    load();
}

/**
 * load the scene data
 */
function load() {
    m_data.load(APP_ASSETS_PATH + "logic_nodes_js.json", load_cb, preloader_cb);
}

/**
 * update the app's preloader
 */
function preloader_cb(percentage) {
    m_preloader.update_preloader(percentage);
}

/**
 * callback executed when the scene data is loaded
 */
function load_cb(data_id, success) {

    if (!success) {
        console.log("b4w load failure");
        return;
    }

    m_app.enable_camera_controls();

    // place your code here

}

function node_cb(input,output) {
    console.log (input[0]);
    output[0] = " Hey Logic!";
}

});

// import the app module and start the app by calling the init method
b4w.require("logic_nodes_js_main").init();

