Blend4Web: Beginner's Guide. Chapter 8: Final Touches
2016-12-28
This lesson concludes the Blend4Web Beginner’s Guide. You have already got a sampling of how to create models in Blender, how to texture them, animate them and prepare them for export to HTML. There is only one step left. You will only need a bit of patience and diligence, and an excellent presentation will be your reward!
Color Selection
So, in the previous lesson you have learned about several Blend4Web logic nodes and used them to create the first part of the presentation. And now, let’s find out how to make our application able to change the color of the phone’s frame.
You will have to create several objects for color samples. They will be used to store the colors and will not be visible in the actual app. You can use simple cubes for them. Create these objects and place them somewhere offscreen. It is also preferable to rename them appropriately. For example, I named them CubeBlue, CubeRed and CubeBlack.
There are three colors that a user can select for the frame of the phone: black, red and blue. You have to create these colors beforehand. The easiest way to do this is to duplicate the black material that is used by default. But, of course, you can create unique materials as well. Only don’t forget to give them proper names. In our case, their names are: body_blue, body_red and body_black. We will need them later.
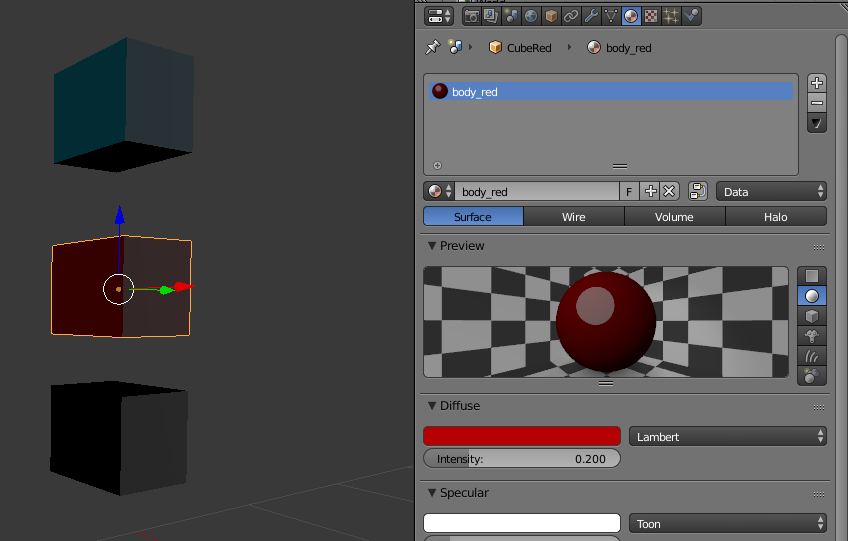
Figure 1
But we also need buttons that will change the materials when clicked by a user. You can use cubes for them too, just refine them into something more appealing to the eye. For example, I simply created three copies of a phone button (the SHIFT+D hot keys) and assigned the corresponding materials to them
For the sake of convenience you can assign a single parent object for all three buttons. For example, you can use the panel as one. To create a link between them, first select a button, then the parent object, and then press CTRL+P (read the 6th lesson for more in-depth instructions).
As the panel with buttons should only appear on the screen once the phone stops rotating, move it from the screen and create a simple animation of it sliding into view.
Now, if you have prepared all necessary objects, let’s proceed with the programming.
So, last time we stopped on the Transform Object node. As the object is selected by a user, it stops rotating and turns to the camera. It is a perfect time to set our buttons loose. To do this, we, of course, will use the familiar Play Animation node (fig. 2).
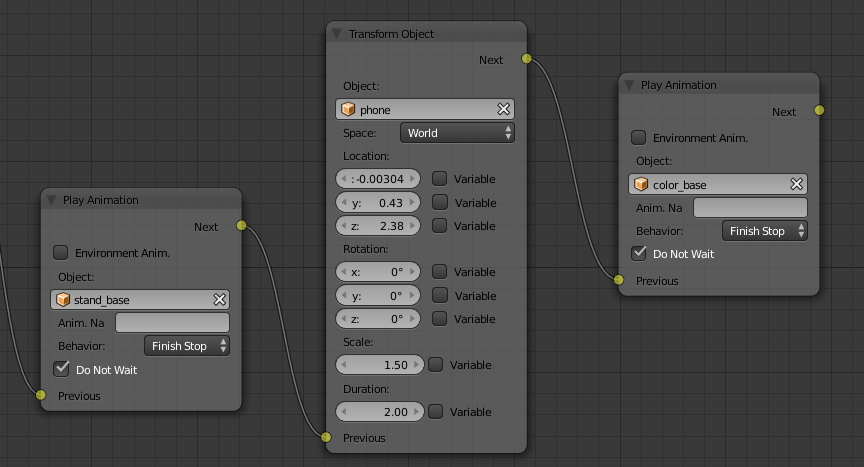
Figure 2
Once the buttons have appeared on the screen, it is time to program them using the Switch Select node. Look closely at this node. It has the “+” button. By pressing it, you can create additional fields for multiple objects. You can also remove object fields with the “-” button. But the general idea remains the same: the node waits for an object to be selected and, if this object is on the list, passes control to a Hit socket, and if it isn’t, to the Miss socket.
Set the Switch Select node for working with buttons (fig. 3).
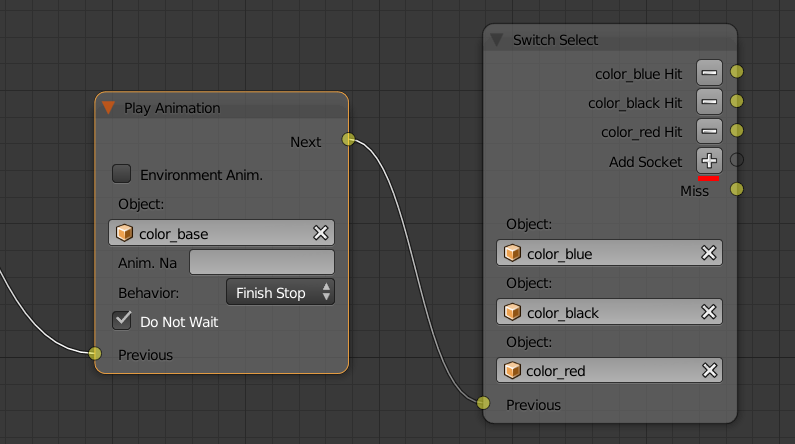
Figure 3
Blend4Web offers us a specific Inherit Material node for changing object’s material on-the-fly. It has two global fields, Source and Destination. It’s easy to guess that the node takes the material of an object in the first field and assigns it to the object in the second field. You also have to specify the material that will be copied and the material that will be replaced by it. As we have three colors, we need the same number of nodes (fig. 4).
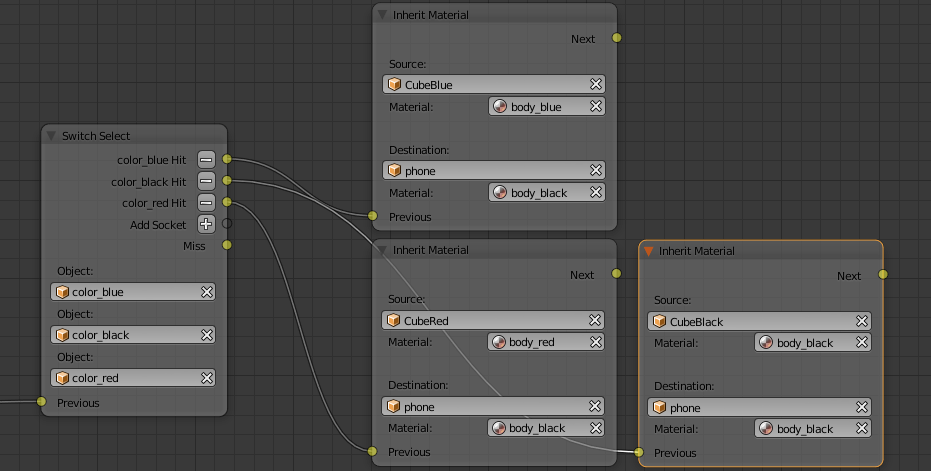
Figure 4
Now you can check how well color selection works in a web browser.
Video On The Screen and Smart Tips
Working with video files isn’t much different from working with regular textures. The principle remains: prepare a polygon (UV map) you need, create a separate material and a texture for it. Simply specify a path to a video files instead of an image (working with textures and materials is described more thoroughly in the 5th lesson).
For the screen, we will use a separate object with a shape and size equal to those of the model’s screen. You can create a new object, or you can make an independent copy. This operation is a bit different from the already familiar Duplicate, as we need to separate a part of an object from it, in this case.
Select the phone model and switch to edit mode. Mark the polygons of the screen and duplicate them by pressing SHIFT+D. Now you have a copy of these polygons, but it is still a part of the object. Without unselecting them, press the P key and choose Selection from the menu that appears. Now, the screen is an independent object. Give it a name and set the phone as its parent.
Blend4Web is able to work with several video formats. You can find the specifics in the user manual. I’ve prepared a little video clip with Android logo in m4v format for my presentation (it can be found in the project archive). Let’s take a look on how to set up a video on the Texture panel (fig. 5):
1. Select Movie from the Source menu. Select a file and load it.
2. Press the Match Movie Length button to automatically count the number of frames in the video.
3. Enable the Auto Refresh option so the video would start automatically.
4. Turn on Cyclic so the video will play in cycles.
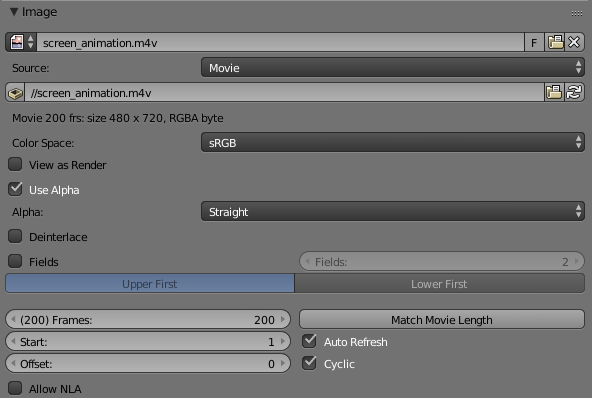
Figure 5
If you export the scene to HTML, the video will start playing right after the application loads. There is no mistake here as we enabled auto-start in the settings ourselves. But we also need to play the video only after the user turns on the smartphone.
There is an easy way to implement this function: we simply have to temporarily hide the object that plays the video. This is why we created a second screen.
Blend4Web features two nodes that can hide or show an object: Hide Object and Show Object.
First, we need to hide the video. Place the Hide Object node (Object category) at the very beginning of our logic tree between the Entry Point and Switch Select node. You can break the old link, but there is a more convenient way of adding a new node between two old ones. Open the Add menu and select the node you need. Move in to the link between the aforementioned two nodes and release the mouse button. Blender will automatically integrate it into the logic tree as shown in Figure 6.
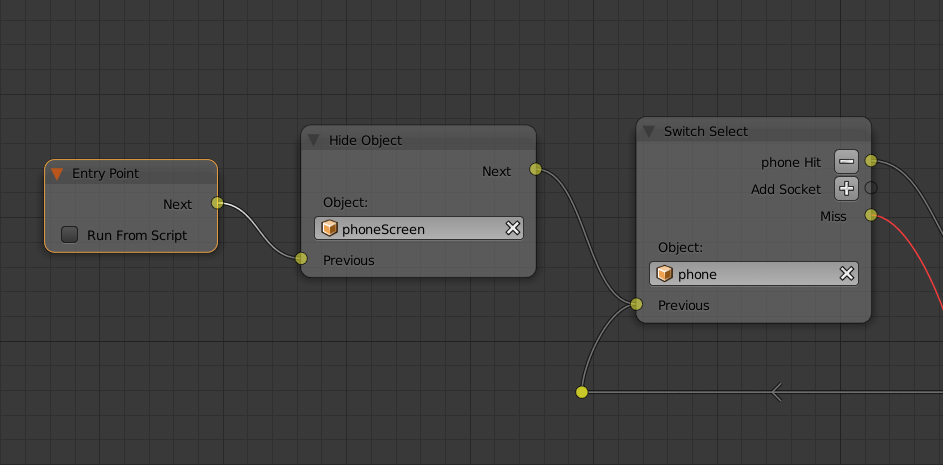
Figure 6
Now we have to add logic for turning on the screen, which should happen only after the phone stops rotating. To do this, we will use the Switch Select node that we are already familiar with. Add a new object field to this node and connect the corresponding output with the Show Object node. The object should be the button on your phone. In my case it is titled Button.
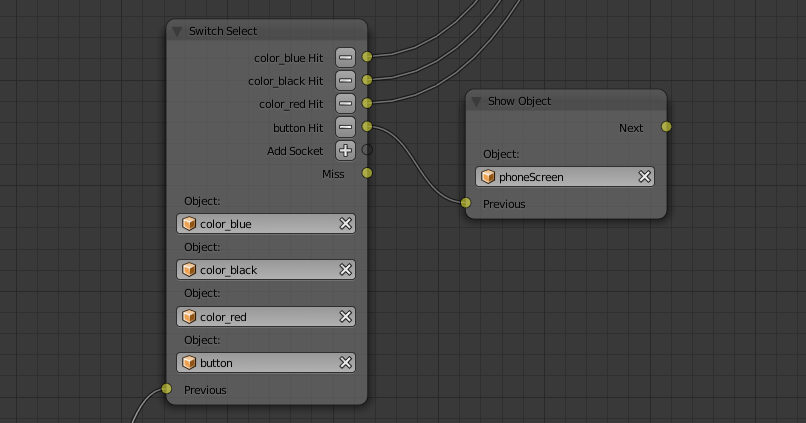
Figure 7
It would also be nice to add hints to our presentation. For this, Blend4Web offers us a ready-made solution, and a very elegant one too. You have probably already seen something like this in b4w demo apps. Let’s find out how it works.
To create a tip, you have to add an “anchor” to wherever you need it in the scene. “Anchors” are really just Empty objects. You can attach such an object to a smartphone’s button and create a description on a dedicated panel.
You need the Anchors and the Meta Tags panels that can be found in the Properties window of any Empty object. Note that a tip can contain additional text. I have only used the Title parameter, so my tips are strictly one-lined. However, you can add more text to the Description field. If you do so, a user will be able to read this text by clicking the title of the tip (fig. 8).
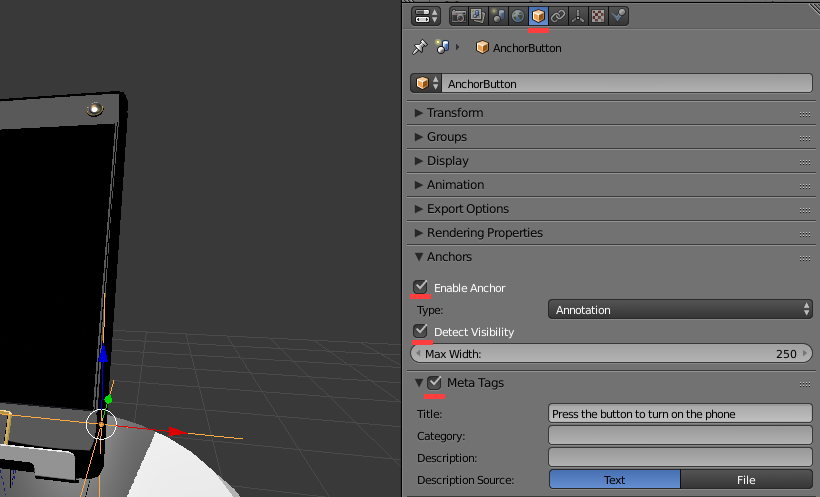
Figure 8
And this, my friends, is the end. My lessons have come to a close. I hope that you have learned enough to create presentations of your own. But do not limit yourself with what you have learned. The Blend4Web framework possesses many more features and functions that I haven’t even touched upon in my tutorials. Using it, you can create just about anything: from presentations and product customizers to complex applications such as entire online shops and video games, of course. So follow event on the Blend4Web official web site, subscribe to my twitter, and maybe I will have something else to make your day.
Updated source files are included in the Blend4Web SDK starting with the release 17.01 for both PRO and CE version. The files are located in the blend4web/blender/tutorials/basic/for_beginners folder.

