Blend4Web: Beginner's Guide. Chapter 4: Working With Materials
2016-11-21
This is the most interesting part of our course. The model is complete, but it is still grey and dull-looking. Just as a real artist, it's your job to make it come to life with bright colors. Yes, this gives you a great feeling...
First, let's come back down to earth, my friends! For the moment, our scene is very grey and we'll have to put forth quite a bit of effort to bring color to it.
A Bit Of Theory
Every object in the scene can have its own color, reflection, refraction and transparency parameters. Material is the sum of the visual settings of an object.
When you run Blender, the scene already has a cube with a grey-colored material created automatically. But as you start adding more shapes, you have to create materials for them manually.
The settings panel can be found in the Properties window you're already familiar with, and can be accessed by clicking on the Material button (fig. 1).
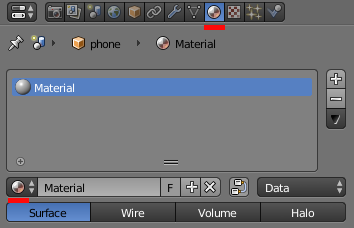
Figure 1
Here's what you should see after selecting a shape and opening the Material panel (picture doesn't shows all present parameters). This main block allows you to control materials assigned to the object.
"Assigned" is the keyword here because a material and an object are separate entities in Blender terms. An object can have multiple materials assigned to it and multiple objects can share the same material.
Selecting, creating and removing materials is done in the part of the panel shown in the Figure 1. The big window contains a list of materials assigned to the object. In the picture, you can see the "phone" object with material named "Material". If this window is empty, this means that the object doesn't have any materials.
The control tools themselves are placed a bit lower (described from left to right). In the menu, you can select one of the existing materials, rename it, make it unique, add new material or just remove it. We will talk about working with multiple materials later, but, for now, I will point out that the delete button (cross), in reality, simply separates material from an object. And bear in mind that unused materials will disappear after a scene is reloaded.
Those Scary Shaders
Programmers are bored, artists are worried… but as a matter of fact everything is very simple.
A shader, from a programmer's point of view, is a short program written for the GPU. There are lots of these little hard-working guys below the surface of Blender, all working for the benefit of artists. All that is important to know is what they can offer to make a picture more colorful.
Before we start talking about shaders, please ask yourself the question "What do I want?". My personal list looks like this:
1. I want a matte screen without specular highlights.
2. I want a shiny black frame.
3. I want a chrome border and golden buttons.
4. And I would also like a glittery holder.
And as there are no genies to be found anywhere nearby, we will have to do everything ourselves. Only, don't forget to turn on the Blend4Web mode in the Engine menu at the top.
For convenience, Blender offers several scene visualization modes. The one that offers the best balance between quality and speed is used by default, and you can also select the option you need in the dedicated Viewport Shading menu of the 3D View window (look at fig. 2).
There is a total of 5 options (6 to be precise, but the Rendered mode is disabled in Blend4Web):
Bounding Box is the fastest option. It only renders cuboids that have the same sizes as the objects.
Wireframe only renders mesh lines of the objects.
Solid is the default mode. In this mode, models are rendered using the colors of their materials.
Texture mode renders texture assigned to the UV map of the object (if it has any) without lighting and shading. This mode can be used while creating a UV map for an object to check how the texture will look on the object.
Material mode renders an object as close to its appearance in the engine as possible.
I recommend switching to Material mode, so that you can control all shader manipulations that await us in real time.
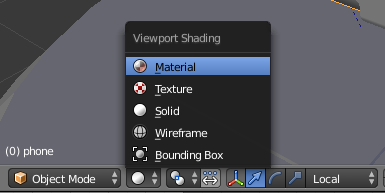
Figure 2
Every material has two basic shaders: Diffuse and Specular. I could talk about light dispersion, reflection angles and other mysterious physical phenomena for a long time, but keep the main thing in mind: Diffuse controls object's main color, and Specular controls highlights (fig. 3).
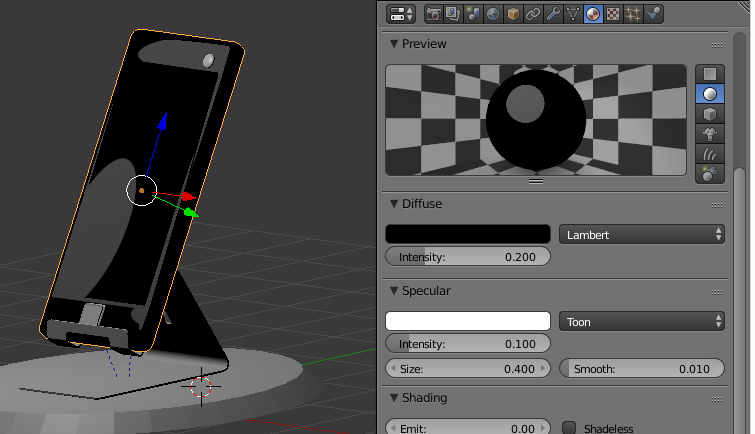
Figure 3
Figure 3 shows a fully set up material for the cell phone's frame along with its parameters. Let's see what I have done here.
The Diffuse tab is for adjusting the corresponding basic shader. I've chosen black as the main color just because I like it. You can set any color you want simply by clicking the color sample with your mouse.
The menu nearby allows you to select the Diffuse computation function. There are total of 5 options in the list. Every one of them has its own visual qualities. Some of them are more suited for metal, others for plastic, and so on. Why don't you experiment with them yourselves, and the result will be rendered in the Preview window and on the model itself.
The Specular tab controls the highlight shader. I myself have set the highlight color to white and selected Toon as the shader itself. It produces non-realistic, bright spots that are clearly visible in the picture.
Keep in mind that every shader can have its own unique parameters, but only one of the parameters is the main and general parameter for every shader, this being Intensity. The higher its value, the more it influences the shader. For example, if you set the intencity of the Diffuse parameter to zero, it will turn the material black, as the diffuse color will not influence the overall color of the material, rendering it colorless.
Multi-Materials
There are times when the model consists of many separate objects, but in our case everything is united. Of course, we don't have to separate anything, as Blender allows us to use several materials on one object. Moreover, you can even assign them to the specific parts of the structure.
You do remember of course that I am planning to make the frame black and shining, the screen mat, and the border around, chrome. This makes three different materials in total.
If you look at the Material panel of your object (see fig. 1), you will see that it only has one material assigned to it. By using the "+" and "-" buttons, you can add or remove slots. One slot for one material.
However, if you try to add a few new slots and set different materials to them, nothing will happen visually. The problem here is that new samples just "don't know" to which part of the model they are assigned, while the first one is by default assigned to the whole model.
Assigning materials is performed in the Edit Mode. After you press the TAB key, the Material panel will change a little (fig. 4).
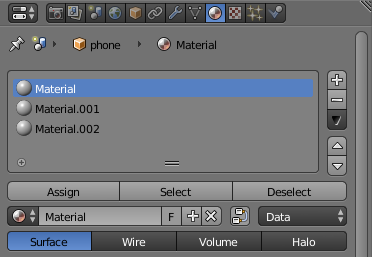
Figure 4
The principle of assigning materials goes like this:
1. Select the polygons you need.
2. Select a slot.
3. Add a material (new or existing one) to it .
4. Press the Assign button.
After you do this procedure, selected elements of the structure will receive their own material. And if you want to know which polygons are using this particular slot, press the Select button.
Please pay attention to another nuance. If a material is used for several objects simultaneously, the F button alongside its name will be replaced with the number of object that use this material (look at fig. 4). Editing such material will affect all object. So, if you need to change it only for a particular model, you have to create an independent copy. To do this, press the button mentioned above and its name will be changed back to F and the material will be duplicated.
Reflection Effects
Almost everything that surround us has some reflective capabilities, some more, and others less. Reflection settings can be used to create more lifelike materials. Take chrome, for example. This silvery metal reflects its environment quite well, and it hardly can be simulated with only highlight shaders.
In the Material panel, there is the Mirror tab which has several parameters: Reflectivity, Fresnel and Blend. The first of them is the most important, as it controls the strength of the reflection. Its value is equal to zero by default. I've chosen the value of 0.8 for my material, because too high of a value will turn material into a perfect mirror. To view the results of your setup, enable the Show Reflectivity option (fig. 5).
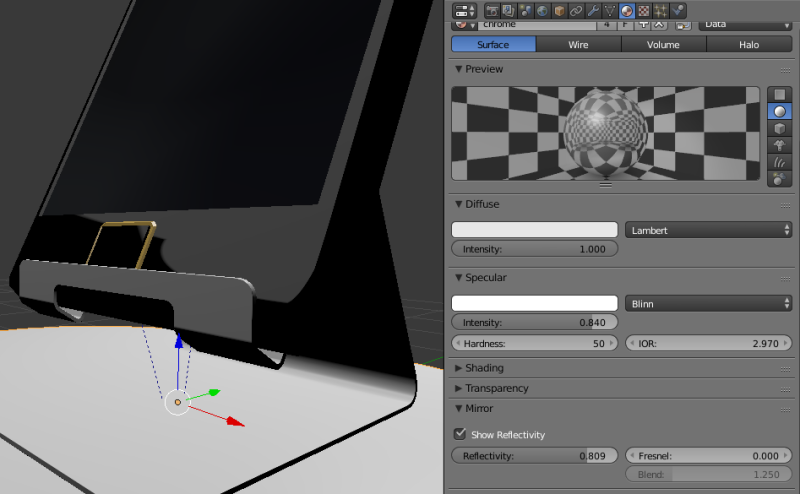
Figure 5
But this is not enough for reflection to work in a web browser. The "cost" (in computation time) for such an effect is relatively high, so Blend4Web developers prepared a separate set of options in the Object panel (fig. 6).
Find the Reflections tab there, and enable what you need:
The Reflective option for an object that will reflect its surroundings.
The Reflexible option for an object that will be reflected.
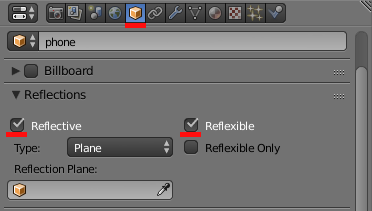
Figure 6
It is entirely possible that after exporting to WebGL all these reflective materials will look grey and bleak. This is caused by the lack of lighting. Try adding another light source behind the model and see how much more colorful the scene looks now.
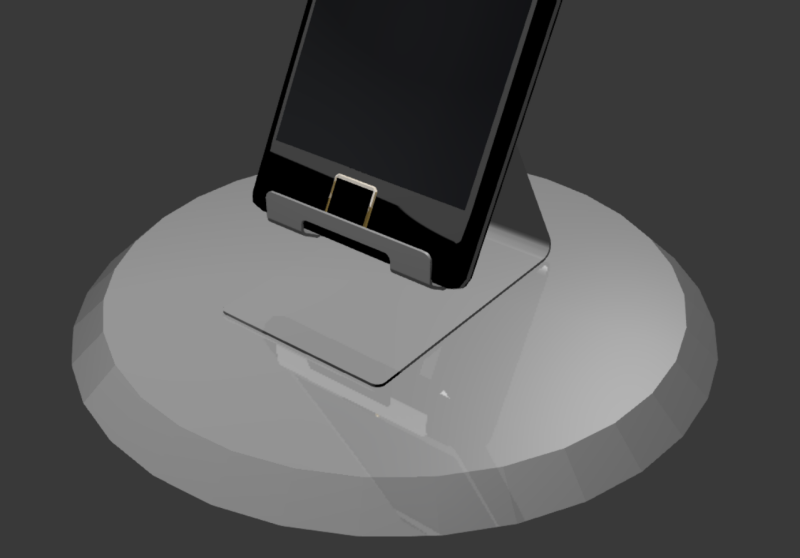
Figure 7
A Few Words On Texturing
Sometimes, visual qualities of the material are not enough to create a realistic image and you have to use ready-made textures, for example, for the camera eye. Of course, you can make the eye entirely in 3D and it will most likely look better that way, but an object like this will simply be too complex to show it in a web browser.
For a texture to be rendered correctly, you have to attach the polygons you need to the image itself, i.e. create a UV map. This is an additional coordinate grid that is used to project the image onto the polygons. It should be noted that creating UV maps is rocket science by itself, and you can talk about it for hours. For this reason, Blender offers you lots of tools for creating them and even a separate editor!
Let's make a small digression. Run Blender and count the windows that are open by default (3D View, Properties etc.). Windows are separated by borders that you can move, changing window size and position.
Some of you count two windows, some four, but the correct answer is five. The program's top menu is also a window. If you drag its border, you will see an empty space. It is used for showing system information.
Note the button that is present in the title of every window. By pressing it, you will open a relatively long list of all possible windows. You are already familiar with some of them (fig. 8).
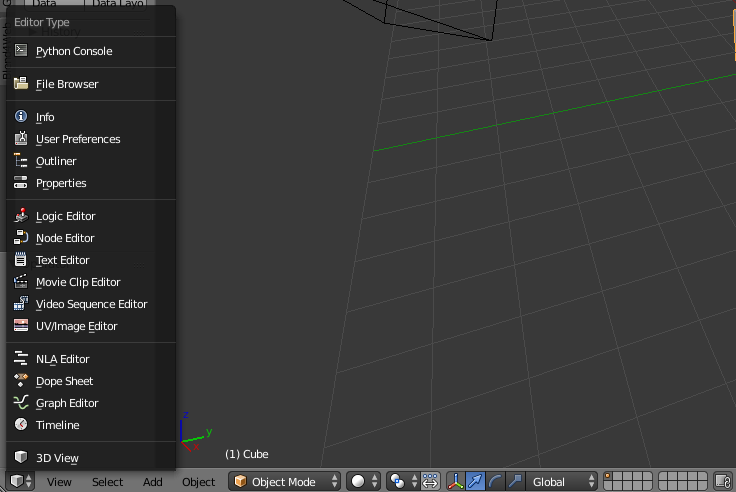
Figure 8
Among this list, there is a window that we need to work with UV maps. It is called UV/Image Editor. You can, of course, open it in the place of any other existing window, but don't be in a hurry.
Blender developers prepared different sets of windows that are often used for various tasks. This list can be found it the top menu of the program. By default, in has Default scheme selected. Open this menu and select UV Editing (fig. 9).
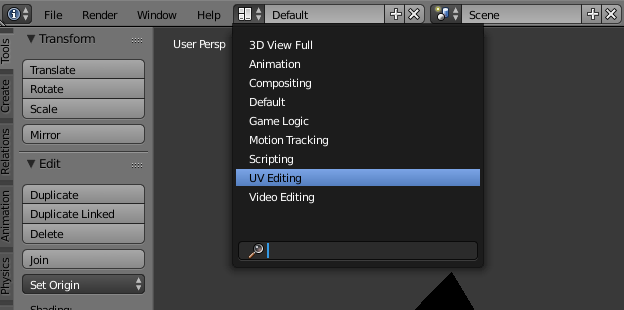
Figure 9
Now everything is prepared to conveniently work with textures. After selecting UV Editing scheme, you will see two windows — the familiar 3D View and the new UV Editor.
Select an object for texturing. In our case, this would be the camera eye. Press the TAB key to switch to Edit Mode. Select only the polygons that will use an image.
Creating a UV map can be done in various ways, but all main functions are encapsulated in the UV Mapping menu that can be opened by pressing the U key in the 3D View window (fig. 10).
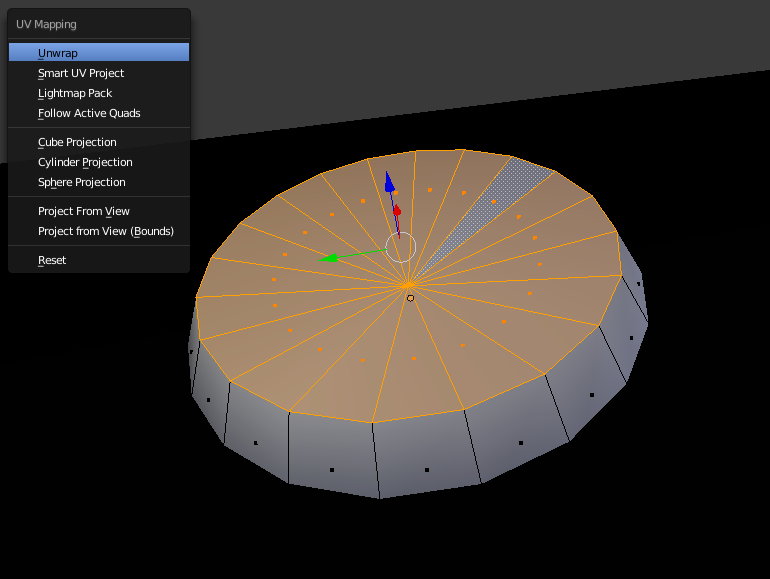
Figure 10
The program can create the coordinate map automatically, if you select the Unwrap entry. In some cases, unwrap templates for popular shapes such as Cube, Cylinder or Sphere may come in handy, but for our object, simple Unwrap should suffice. Select it, and you will see a complete UV map it the neighboring window (fig. 11).
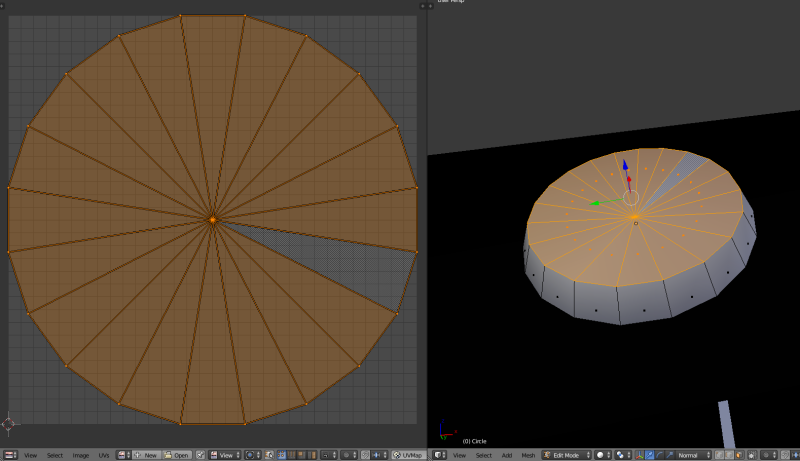
Figure 11
Now we have to add an image. Press the Open button in the UV Editor window title. It will open a file manager where you can choose an image you need. After that, press the Open Image button.
The last stage of working with this editor is adjusting the UV map to the image. The hot keys to manipulate UV maps are the same as in the 3D View, i.e. the G, R and S keys. You can move separate vertices, edges or even UV planes. To enable the corresponding selection mode, there is the UV Selection set of buttons at the bottom of the UV Editor window. Don't forget to switch to the Texture view mode in the 3D View window, so you'll be able to control your work!
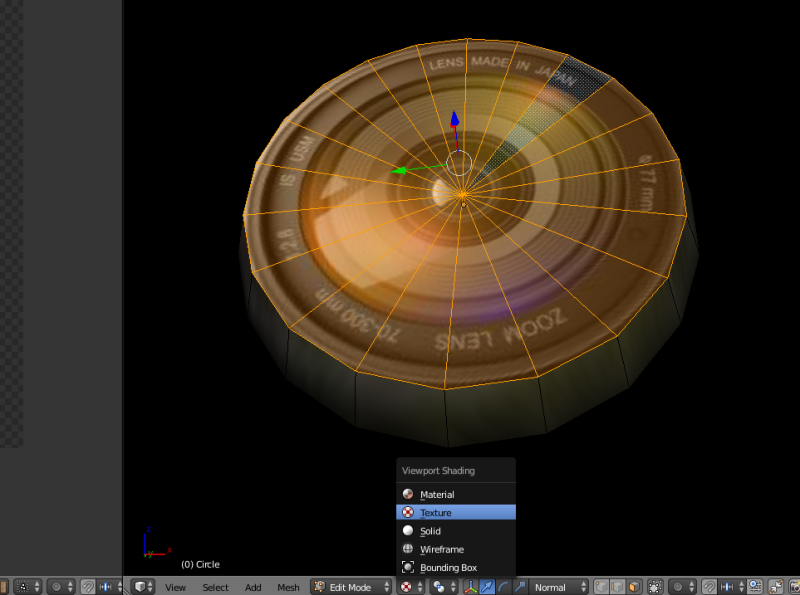
Figure 12
The texture is all set, and it is even visible in the 3D View window under the Texture view mode, but you won't see it if you try to export your scene to WebGL. This is because while UV Editor allows you to adjust UV maps, it does not attach textures to objects. You can be sure of it if you switch to the Material view mode. So, switch back to the Default window option and create a new material for the camera eye.
This time we will omit setting up the material, as there is nothing new here. But for working with textures, there is a dedicated panel with the eponymous title in the Properties window. It is in this panel where you can add new slots, set blending or texture view modes (fig. 13).
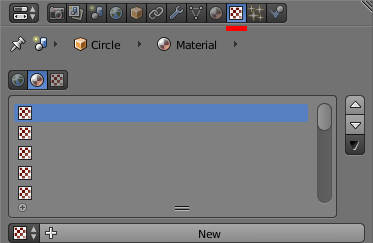
Figure 13
As you can see, the main window for working with textures is no different from that of the Material panel. Press the New button, select Image or Movie texture type from the Type menu. Find the Image tab in the settings and open your texture.
Also, take notice of the Mapping tab. Here, you can set the method by which the texture will be projected onto the model. As we are working with the UV, we should select the corresponding entry from the Coordinates menu (fig. 14).
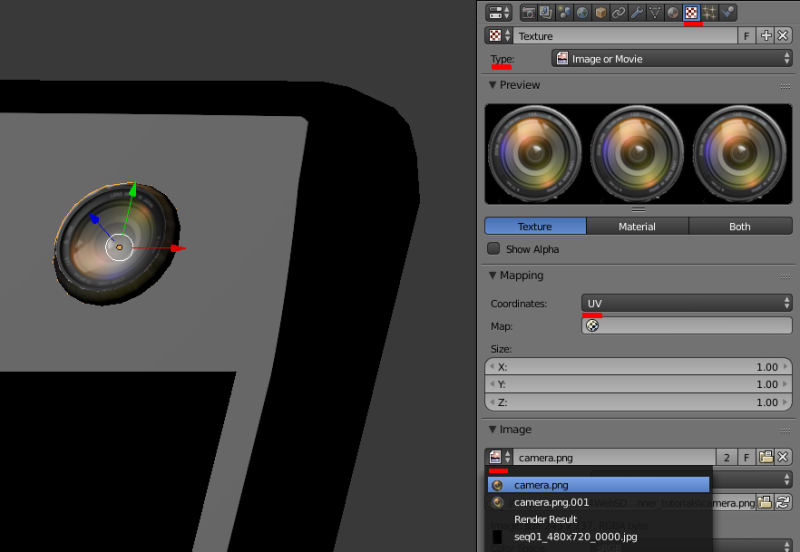
Figure 14
So, from this lesson you have learned about some of the tools for bringing colors to the 3D world. The image has improved a lot, but believe me, this is only the beginning.
Link to the interactive scene.
You can find the source blend file in both Blend4Web CE and PRO SDK. They are in the following directory: blend4web/blender/tutorials/basic/for_beginners.

