Related to 1st person and games in general, any plans on what the next game tutorials will be about? We have seen an FPS style game as well as a 3D platformer can be done, what's next? Or are there certain game mechanics we can hope to see up next?
First Person Controls and Physics
2015-02-12
It is not a secret that today's first-person game applications are very popular. The reason for this is clear. Such an approach allows a player to better interact with the environment, feel like he or she is a part of the current events and it is often simply more comfortable from the viewpoint of the gameplay. Today we look at how to create a base frame for such an application with the help of the Blend4Web engine.
Location
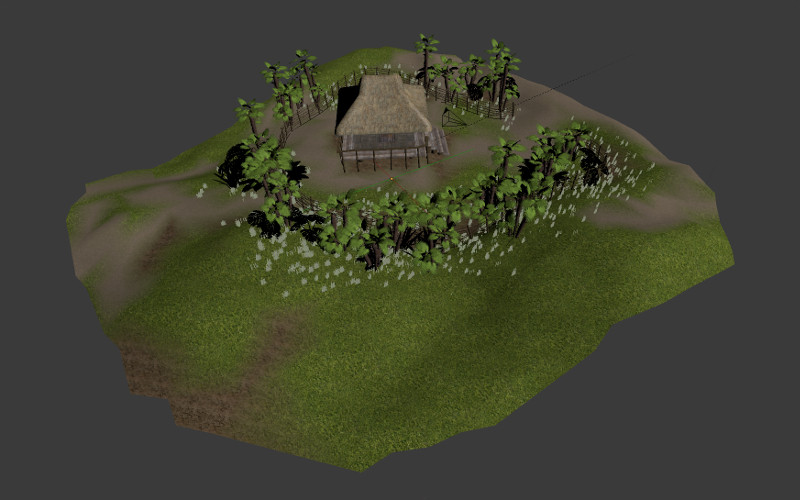
First, we'll create a basis the whole location inside which the character will move. Let's add an object with some irregularities. It will be a terrain and a physical "foundation" for our whole scene. Also, let's ask an artist to create a small, pretty house for us, with which we'll look at how to manage static physics.

Physics
In Blend4Web, there are two types of physical object behavior: static and dynamic. In the first case, it is assumed that an object will not change its state as time passes. In the second group there are objects which can be translated by means of physics: all the characters, different pickable objects, crates, barrels etc.
Moreover, there are two possible ways to build the physical bounding volume of an object:
- using its real geometry;
- with the help of physical shapes (sphere, cube, capsule etc).
Static Objects
The terrain will be a static object with its geometry generating physical volume. In order to do this we choose Physics Type: Static in the objects physics properties and it is necessary to turn on the Special: Collision flag in material properties. Now dynamic objects will be able to collide with the terrain and the character will be able to walk on it.
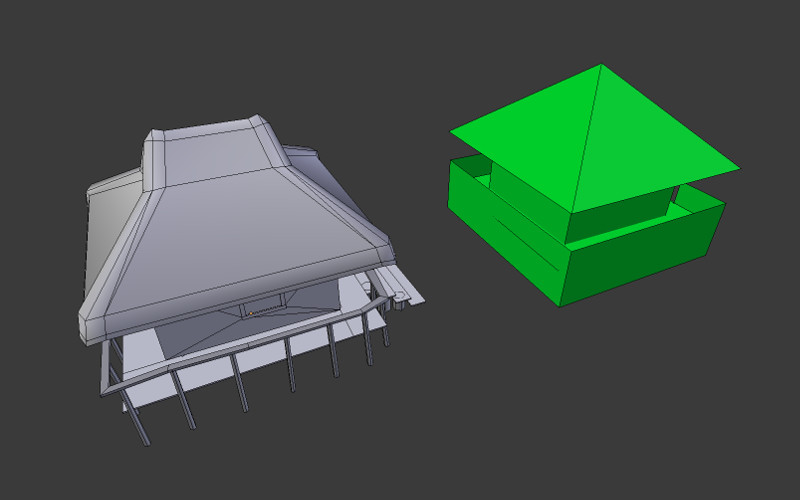
We could do the same with the house but in our case we'll resort to a little optimization. To simplify physics geometry we'll create a new object with a significantly reduced vertices count. We must turn on the Special: Collision flag in the new object's material settings as well as forbid its rendering with the Do not Render flag. It is shown in green on the image below.

Such a technique is widely used in scenes where serious physical calculations are expected. In games, this allows to avoid unnecessary calculations and significantly increase FPS in the physics engine.
Dynamic Objects
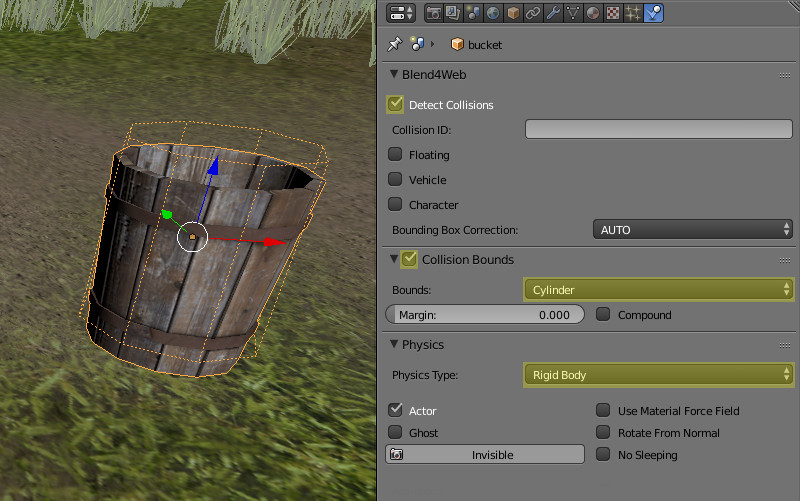
Let's place some object which a character will be able to interact with in the scene. We'll use a small bucket:

As we can see it is a dynamic object of a Rigid Body type. For physics to be able to work with such objects it is necessary to turn on the Detect Collisions flag. The cylinder is used here as a bounding shape. This is a much more optimized option and it should be used whenever possible.
Character
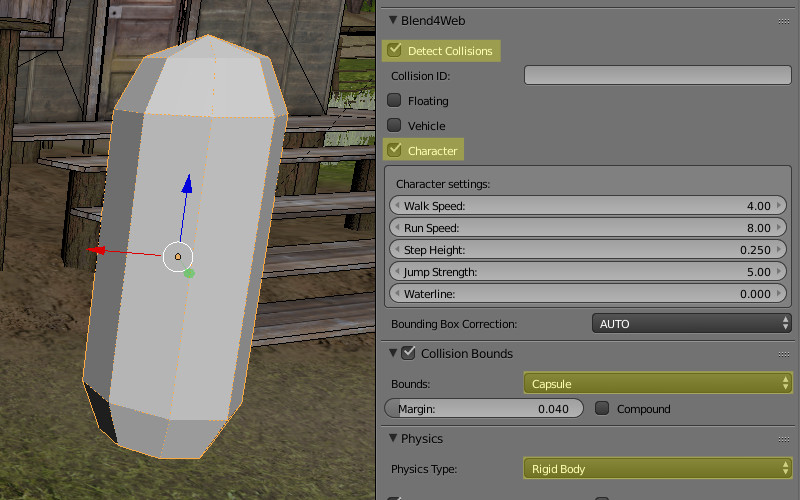
Let's create an object for the future character and append dynamics physics with the Capsule shape to it. In the Blend4Web bar, we'll turn on the Detect Collisions and Character flags. Character properties can be left alone.

The last thing to pay attention to during the scene setup is the camera type. In our case the best option is to use an EYE type, and turn on the Use Vertical Rotation Clamping flag to block camera in extreme vertical positions.
Controls
It's time to bring some life to our scene. Let's use a base application from the developers documentation. The next code will be placed in the loading callback:
function load_cb(data_id) {
    // make camera follow the character
    var camobj = m_scs.get_active_camera();
    var character = m_scs.get_first_character();
    m_cons.append_stiff_trans(camobj, character, [0, 0.7, 0]);

    // enable rotation with mouse
    var canvas_elem = m_main.get_canvas_elem();
    canvas_elem.addEventListener("mouseup", function(e) {
        m_mouse.request_pointerlock(canvas_elem);
    }, false);

    setup_movement()
}
First of all, the camera is attached to the character with a translation offset of 0.7 units in the vertical direction. Second, there is an attempt to lock the mouse cursor when the canvas is clicked. The mouse.js addon will automatically ensure that the character turns as the mouse moves. Now let's write the control logic in the setup_movement function. First, let's define all the variables to be used later:
var key_a = m_ctl.create_keyboard_sensor(m_ctl.KEY_A);
var key_s = m_ctl.create_keyboard_sensor(m_ctl.KEY_S);
var key_d = m_ctl.create_keyboard_sensor(m_ctl.KEY_D);
var key_w = m_ctl.create_keyboard_sensor(m_ctl.KEY_W);
var key_space = m_ctl.create_keyboard_sensor(m_ctl.KEY_SPACE);
var key_shift = m_ctl.create_keyboard_sensor(m_ctl.KEY_SHIFT);

var move_state = {
    left_right: 0,
    forw_back: 0
}

var move_array = [key_w, key_s, key_a, key_d, key_shift];
var character = m_scs.get_first_character();
The first 6 lines just create sensors for control keys. Apart from the typical WASD controls, there is a speedup using SHIFT key and a jump using space bar. The move_state object is responsible for the character's speed in forward and side directions. The move_array is an array of control sensors. We use the first character found in the scene as a controlled object and save it into the character variable. Next, we define the main callback for the movement controls - move_cb.
var move_cb = function(obj, id, pulse) {
    if (pulse == 1) {
        switch (id) {
        case "FORWARD":
            move_state.forw_back = 1;
            break;
        case "BACKWARD":
            move_state.forw_back = -1;
            break;
        case "LEFT":
            move_state.left_right = 1;
            break;
        case "RIGHT":
            move_state.left_right = -1;
            break;
        case "RUNNING":
            m_phy.set_character_move_type(obj, m_phy.CM_RUN);
            break;
        }
    } else {
        switch (id) {
        case "FORWARD":
        case "BACKWARD":
            move_state.forw_back = 0;
            break;
        case "LEFT":
        case "RIGHT":
            move_state.left_right = 0;
            break;
        case "RUNNING":
            m_phy.set_character_move_type(obj, m_phy.CM_WALK);
            break;
        }
    }

    m_phy.set_character_move_dir(obj, move_state.forw_back,
                                      move_state.left_right);
};
This callback will be called when any of the following keys are pushed or released: W, A, S, D, Shift. In the first case (push) the pulse variable will equal 1, in the second case (release) it will be -1. The move_state stores information about currently pressed keys. So for example its forw_back field will be equal to:
- 1, if W is pressed,
- -1, if S is pressed,
- 0, if none of these keys is pressed.
The next sensor manifolds are responsible for a logic of move_cb function calls:
m_ctl.create_sensor_manifold(character, "FORWARD", m_ctl.CT_TRIGGER,
    move_array, function(s) {return s[0]}, move_cb);
m_ctl.create_sensor_manifold(character, "BACKWARD", m_ctl.CT_TRIGGER,
     move_array, function(s) {return s[1]}, move_cb);
m_ctl.create_sensor_manifold(character, "LEFT", m_ctl.CT_TRIGGER,
    move_array, function(s) {return s[2]}, move_cb);
m_ctl.create_sensor_manifold(character, "RIGHT", m_ctl.CT_TRIGGER,
    move_array, function(s) {return s[3]}, move_cb);

var running_logic = function(s) {
   return (s[0] || s[1] || s[2] || s[3]) && s[4];
}
m_ctl.create_sensor_manifold(character, "RUNNING", m_ctl.CT_TRIGGER,
    move_array, running_logic, move_cb);
All sensor manifolds have a CT_TRIGGER type. This means they will fire whenever a logic function value changes. The character's accelerated movement logic includes all 5 sensors. Thus, a speed increase or decrease happens when the value of one of the movement sensors or Shift sensor changes.
The last action is the character's jump:
var jump_cb = function(obj, id, pulse) {
    m_phy.character_jump(obj);
}
m_ctl.create_sensor_manifold(character, "JUMP", m_ctl.CT_SHOT,
        [key_space], null, jump_cb);
Everything here is similar to the character's movement, but the sensor manifold has changed its type to CT_SHOT. Therefore, the callback is being fired only when the space bar is pressed but not when it is released.
As a result of these simple operations, we have a nice start for a full functional game in first person view. You can go further and add abilities to pick up some objects, to carry something or let the character interact with the game objects by pressing some keys.
Link to the standalone application.
All the sources will be available it the next free Blend4Web SDK.
Changelog
[2015-02-12] Initial release.
[2015-02-16] Camera type changed to EYE.

